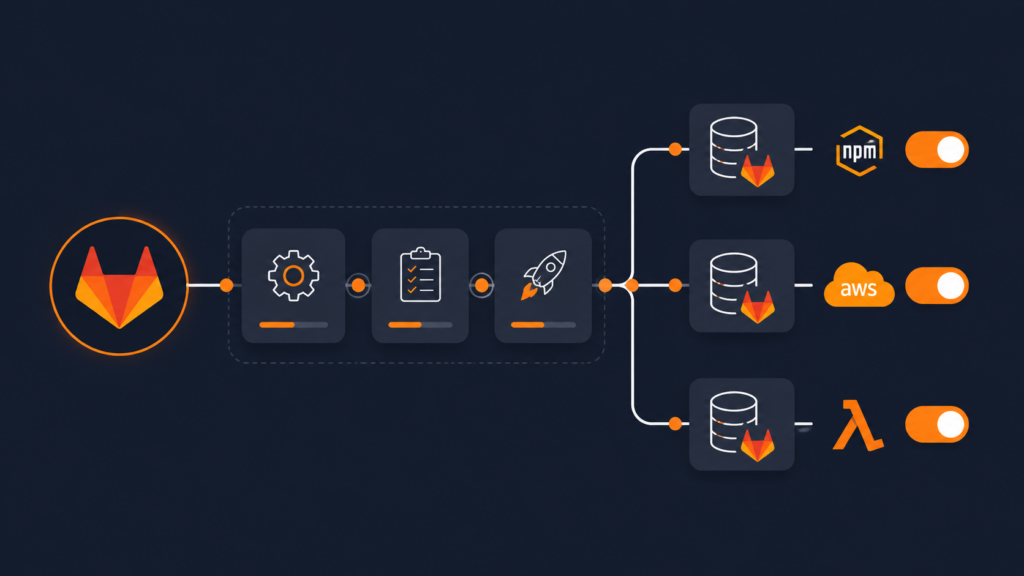
Picture a single repository that holds three different things: some small bits of cloud code (AWS Lambda), a front-end bundle that needs to live on a CDN, and a couple of npm packages other teams install. Normally each of those would get its own repo, its own pipeline, and its own way of shipping to test and production. That’s a lot of moving parts to keep in sync. A monorepo GitLab CI/CD pipeline puts all three under one roof and ships them to every environment from one place.
Think of it like one delivery truck that drops off three different packages on the same
route. Instead of three trucks leaving from three depots, you load everything once, plan
the stops once, and the same driver handles qa, uat, and
prod. In this guide, that “one truck, many stops” idea is built with a single
GitLab pipeline that you can point at any environment by flipping a few settings.
Quick vocabulary before we start. A monorepo is one Git repository that
holds several projects side by side (here, in a packages/ folder).
GitLab is where the code lives, and CI/CD is the
automation that builds, tests, and ships it without anyone doing it by hand. A
pipeline is the chain of steps that automation runs. You’ll edit the same
YAML file whether you’re on WSL2 Ubuntu in Windows or any other system, because the actual
work happens on GitLab’s servers, not your laptop.
Prerequisites
This guide is hands-on, so you’ll get the most out of it if you have:
- A GitLab project (the cloud version or a self-hosted one, version 16.0 or newer) where you’re allowed to change settings
- A monorepo layout, a
packages/folder holding your shared code, your front-end bundle, and your Lambda code - GitLab “runners” available to your team, these are the machines that actually do the work
- For the parts that talk to AWS: the AWS CLI v2 installed in your runner, plus a trust connection set up in AWS
- A little comfort with the basic GitLab CI building blocks (stages, jobs, and rules)
Why one monorepo pipeline beats three separate ones
When Lambda, the CDN bundle, and the npm packages each live in their own repo, you end up maintaining three pipelines that all do roughly the same thing: install, build, test, and ship. Fix a problem in one and you’ve still got two more to update. Worse, getting all three into the same environment at the same version becomes a coordination puzzle.
A monorepo flips that around. One install and one build cover
everything. One version number ties the whole release together. And one pipeline decides
which of the three artifacts ships, and to which environment. To keep that single pipeline
flexible, we expose a handful of inputs: simple dials and switches that
say “ship to prod,” “publish the packages,” “skip the CDN this time,” and so on.
Step 1: Add the dials and switches (spec:inputs)
An input is a setting you can choose per run, like a dial or an on/off
switch on the pipeline. You define them at the very top of the file in a section called
spec:inputs. Later, you read a chosen value with the funny-looking
$[[ inputs.name ]] syntax. This is what lets one pipeline serve every
environment and every combination of the three artifacts.
spec:
  inputs:
    target:
      type: string
      description: "The environment this gets deployed to."
      default: "qa"
      options:
        - "qa"
        - "uat"
        - "prod"
    publish:
      type: boolean
      description: "Publish the npm packages to the registry?"
      default: false
    cdn:
      type: boolean
      description: "Deploy the built bundle to the CDN?"
      default: false
    lambdas:
      type: boolean
      description: "Deploy the SAM Lambda stack?"
      default: false
---
Reading that in plain English:
targetis a dropdown. The choices areqa,uat, orprod: basically “test area,” “staging area,” and “the real thing.” If nobody picks, it defaults toqa.publish,cdn, andlambdasare simple on/off switches (called boolean, which just means true or false), one for each of the three things this monorepo can ship. They’re all off by default.
One handy extra: copy the chosen environment into a variable so it shows up in every step’s info panel. It’s a small thing that saves you guessing later which environment a run was for.
variables:
  AWS_DEFAULT_REGION: us-east-1
  APP_NAME_SLUG: myapp
  TARGET_ENV: "$[[ inputs.target ]]"
Step 2: Decide when the pipeline should even run
You don’t want automation firing off at random. The workflow section is the
bouncer at the door, it decides whether a pipeline runs at all. The rules are checked top
to bottom, and the first one that matches wins.
workflow:
  name: 'myapp · target=$[[ inputs.target ]] · $CI_COMMIT_REF_NAME'
  rules:
    # A pushed tag should never start a pipeline, releases are launched by hand.
    - if: '$CI_PIPELINE_SOURCE == "push" && $CI_COMMIT_TAG'
      when: never
    - if: '$CI_PIPELINE_SOURCE == "merge_request_event"'
    - if: '$CI_COMMIT_BRANCH =~ /^(develop|main)$/'
    # Manually launched run aimed at production, only proper version numbers allowed.
    - if: '"$[[ inputs.target ]]" == "prod" && $CI_PIPELINE_SOURCE == "web" && $CI_COMMIT_REF_NAME =~ /^v(\d+\.\d+\.\d+)$/'
    # Manual run aimed at a test area, looser, allows early "preview" versions.
    - if: '"$[[ inputs.target ]]" != "prod" && $CI_PIPELINE_SOURCE == "web" && $CI_COMMIT_REF_NAME =~ /^v(?:test-)?(\d+\.\d+(?:\.\d+)?(?:[.-][0-9A-Za-z]+)*)$/'
    - when: never
What that bouncer is enforcing, in everyday terms:
- Proposing a change (a “merge request”) or saving to the main lines of code (
develop/main) runs the safe stuff: build and test, nothing shipped. - Only a deliberate, button-click run on a version tag is allowed to ship anything, to any of the three artifacts.
- The final
when: neveris the catch-all “no” for everything else.
Don’t worry about decoding the symbols like =~ and the slashes. That’s a
pattern match, a way of saying “the name has to look like v1.2.3.” You can
read it as “must be a real version number.”
Step 3: Set a default toolbox and a shared version step
Every step runs inside a small pre-loaded environment called an image: think of it as a clean workstation with the right tools already installed. Setting a
default image means every step starts from the same workstation.
The “prepare” step then figures out one version number for this release and passes it along to every later step. This is a key monorepo idea: the Lambda stack, the CDN bundle, and the npm packages all ship under the same version, so a release is one coherent thing. It writes the values to a little handoff file (a dotenv artifact) that the next steps can read.
default:
  image: node:24-slim

prepare-$[[ inputs.target ]]:
  stage: .pre
  before_script:
    - PACKAGE_VERSION=$(node -p "require('./package.json').version")
  script:
    - |
      if [[ "$[[ inputs.target ]]" == "prod" ]]; then
        PUBLISH_VERSION="${PACKAGE_VERSION}"
        NPM_TAG="latest"
      else
        PUBLISH_VERSION="${PACKAGE_VERSION}-$[[ inputs.target ]].${CI_PIPELINE_IID}"
        NPM_TAG="$[[ inputs.target ]]"
      fi
    - |
      {
        echo "PUBLISH_VERSION=$PUBLISH_VERSION"
        echo "NPM_TAG=$NPM_TAG"
      } >> variables.env
  artifacts:
    reports:
      dotenv: variables.env
The logic is simple: for production, use the plain version number and mark it “latest.” For test areas, tack on a suffix so test builds never get confused with the real release. Any later step that asks for this step’s handoff file gets those values automatically , which is how all three artifacts stay on the same version.
Step 4: Build and test the whole monorepo once
This is where the monorepo earns its keep. One step installs everything the repo needs, builds all the packages together, and then double-checks that the important output file actually exists. That last check sounds obvious, but it’s a real lifesaver, a missing file that slips through quietly can break things much later, when it’s harder to trace.
build-$[[ inputs.target ]]:
  stage: build
  before_script:
    - mv ${NPMRC_CONFIG} ./.npmrc
  script:
    - npm ci --cache .npm --prefer-offline
    - npm run build
    - |
      if [ ! -f packages/ui/dist/myapp-ui.esm.js ]; then
        echo "ERROR: build bundle missing"
        exit 1
      fi
  artifacts:
    paths:
      - packages/ui/dist/
    expire_in: 1 day
  cache:
    key:
      files:
        - package-lock.json
    paths:
      - .npm/
    policy: pull-push
Because it’s a monorepo, that single npm ci and npm run build
cover the shared code, the UI bundle, and the Lambda code in one go. The cache
part is just a speed trick, it remembers downloaded files between runs so the build doesn’t
re-download everything each time. A separate test step (not shown here) runs the project’s
tests and reports the results right inside the merge request, so reviewers can see at a
glance if anything broke.
Step 5: Publish the npm packages with a switch
Now the three “ship it” steps. First, the npm packages. This step only runs when the
publish switch is on, so you can update the CDN or Lambdas without re-publishing
packages, or vice versa. The same monorepo pipeline now serves every combination.
npm-publish-$[[ inputs.target ]]:
  stage: deploy
  parallel:
    matrix:
      - PACKAGE_DIR: ["packages/shared", "packages/ui"]
  script:
    - cd "${PACKAGE_DIR}"
    - npm version "${PUBLISH_VERSION}" --no-git-tag-version --allow-same-version
    - npm publish --tag ${NPM_TAG} --ignore-scripts
  needs:
    - job: prepare-$[[ inputs.target ]]
      artifacts: true
    - job: build-$[[ inputs.target ]]
      artifacts: true
  rules:
    - if: '"$[[ inputs.target ]]" == "prod" && $CI_PIPELINE_SOURCE == "web" && $CI_COMMIT_REF_NAME =~ /^v(\d+\.\d+\.\d+)$/ && "$[[ inputs.publish ]]" == "true"'
when: on_success- The
parallelpart publishes both packages from the monorepo at the same time instead of one after another - The last line of the rule,
"$[[ inputs.publish ]]" == "true", is the switch check, it only runs if you turned publishing on needsjust says “wait for the prepare and build steps first, and grab their results”, so the packages publish at the same version the build produced
New to publishing Node packages? My walkthrough on publishing an NPM package via the GitLab Package Registry covers the registry setup in plain steps.
Step 6: Ship the CDN bundle and the Lambdas to AWS, without storing passwords
The other two artifacts go to AWS. The old way was to store a permanent password in GitLab, which is risky if it ever leaks. The safer modern way, called OIDC, is like showing a temporary visitor’s badge instead of carrying a master key. GitLab asks AWS for a short-lived badge, uses it, and it expires on its own. The CDN deploy uses it to push the built bundle to storage and refresh the delivery network.
cdn-deploy-$[[ inputs.target ]]:
  stage: deploy
  id_tokens:
    GITLAB_JWT:
      aud: https://gitlab.com
  script:
    - aws s3 sync packages/ui/ "s3://${CDN_S3_BUCKET}/${APP_NAME_SLUG}/v${MAJOR_VERSION}/" --only-show-errors
    - aws cloudfront create-invalidation --distribution-id ${CLOUDFRONT_DISTRO_ID} --paths "/${APP_NAME_SLUG}/v${MAJOR_VERSION}*"
  needs:
    - job: prepare-$[[ inputs.target ]]
      artifacts: true
    - job: build-$[[ inputs.target ]]
      artifacts: true
In plain words: copy the built files up to storage (S3), then tell the delivery network (CloudFront) “throw away the old version” so visitors see the fresh one. A CDN is just a network of servers around the world that keep copies of your files close to users so pages load faster.
The Lambda step (for the small bits of cloud code in packages/lambdas) follows
the same idea but uses a tool called AWS SAM to deploy, pointed at the right environment with
--config-env. Two habits worth copying: check that any required secret exists
before deploying, so you get a clear error instead of a confusing one halfway
through; and keep secrets in GitLab’s protected, hidden variables, never written into a
file that lands in your code history.
lambdas-deploy-$[[ inputs.target ]]:
  stage: deploy
  resource_group: lambdas
  id_tokens:
    GITLAB_JWT:
      aud: https://gitlab.com
  script:
    - |
      if [ -z "${JWT_SECRET}" ]; then
        echo "ERROR: JWT_SECRET is not set for '$[[ inputs.target ]]'."
        exit 1
      fi
    - cd packages/lambdas
    - sam build --config-env "$[[ inputs.target ]]"
    - sam deploy --config-env "$[[ inputs.target ]]" --parameter-overrides "JwtSecret=${JWT_SECRET}" --no-confirm-changeset --no-fail-on-empty-changeset --capabilities CAPABILITY_IAM CAPABILITY_NAMED_IAM
Notice how --config-env "$[[ inputs.target ]]" sends the very same Lambda code
to qa, uat, or prod just by changing the input, that’s
the multi-environment payoff in action. The resource_group: lambdas line is a
quiet but important one: it tells GitLab “only let one of these run at a time,” which prevents
two deploys from stepping on each other. For the full AWS side of this, see
how to deploy AWS Lambda with SAM and GitLab CI/CD using OIDC.
Step 7: Borrow more shared pieces and lock the version
You can pull in even more shared building blocks from a separate “templates” repo. The
small trick below saves you from repeating the repo name everywhere, and pinning a
ref (a fixed version, not a moving branch) means an update upstream won’t
surprise you mid-deploy.
.common_template: &common_template
  project: 'your-org/cicd-templates'
  ref: v1.0.0

include:
  - <<: *common_template
    file: '/templates/base-image.gitlab-ci.yml'
  - <<: *common_template
    file: '/templates/security-scan.gitlab-ci.yml'
The &common_template and *common_template bits are just a
copy-and-reuse shortcut in YAML, write the repo details once, reuse them as many times as
you like. Pinning to v1.0.0 rather than “latest” is the safe choice, the same
way you’d lock a recipe to a known-good version.
Putting it together: one release, three artifacts, one environment
Here’s the payoff. Whether this pipeline lives directly in the monorepo or is shared from a template repo, kicking off a full release is just a matter of setting the switches for the run, pick the environment and choose which of the three artifacts go out:
include:
  - project: 'your-org/component-library'
    ref: v2.4.8
    file: '/ci/monorepo.gitlab-ci.yml'
    inputs:
      target: prod
      publish: true
      cdn: true
      lambdas: true
That’s the whole thing. One run ships to production: it publishes both npm packages, updates
the CDN, and deploys the Lambdas, all at the same version, from the same monorepo, in one
place. Want a quieter qa run that only refreshes the CDN? Set
target: qa, flip cdn: true, leave the other two off. If your setup
also pulls private container images, the same borrow pattern works nicely with
pulling Docker images from a private GitLab registry.
Conclusion
And that’s the shape of a monorepo GitLab CI/CD pipeline that ships three very different things to multiple environments from one place: keep Lambda, the CDN bundle, and the npm packages under one roof, build and version them together, guard when things run, and use a few inputs to pick the environment and which artifacts go out. Even if you skipped every code block, the idea holds, one truck, three packages, every stop on the route. From here, you could set up the full SAM and OIDC deploy or match your local Node.js version to the one CI uses so things behave the same on your machine and in the cloud.