Setting up WordPress on your own server gives you full control over your website. In this guide, we will be deploying WordPress on an EC2 Ubuntu 22.04 server using Nginx as our web server, PHP for dynamic content processing, Let’s Encrypt provides free SSL certificates for websites, and MySQL as the database management system.
Prerequisites
- A fresh EC2 Ubuntu 22.04 server instance, refer to my official guide on how to deploy EC2 Ubuntu 22.04 LTS on AWS.
- A non-root user with sudo privileges.
- A domain name pointed to your EC2 server’s IP address.
Step 1. Connect to EC2 Ubuntu 22.04 on AWS
First, open Terminal (Mac/Linux) and log in to your EC2 Ubuntu 22.04 via SSH:
ssh -i your-key.pem ubuntu@your-ec2-public-ipv4-address
Note: Before connecting to your EC2 Ubuntu 22.04 server, make sure to change the permissions for your private key file using the following command:
chmod 400 your-key.pem
When prompted with the message for the first time saying ‘Are you sure you want to continue connecting (yes/no/[fingerprint])?‘, type ‘yes‘ to accept the connection to your EC2 instance.
Step 2. Update the System
Update the existing package lists:
sudo apt update
Step 3. Install Nginx
Install Nginx, which will serve as our web server:
sudo apt install nginx -y
Once installed, enable and start the Nginx service:
sudo systemctl enable nginx
sudo systemctl start nginx
sudo systemctl status nginx

Step 4. Install MySQL
Next, install MySQL to manage the WordPress database:
sudo apt install mysql-server -y
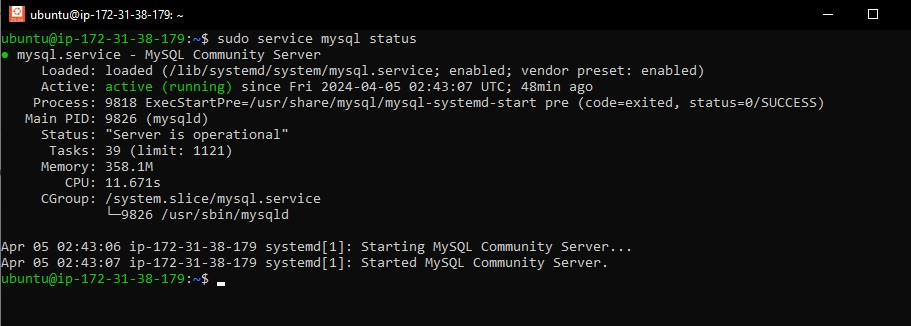
sudo service mysql status
Secure your MySQL installation and set a root password:
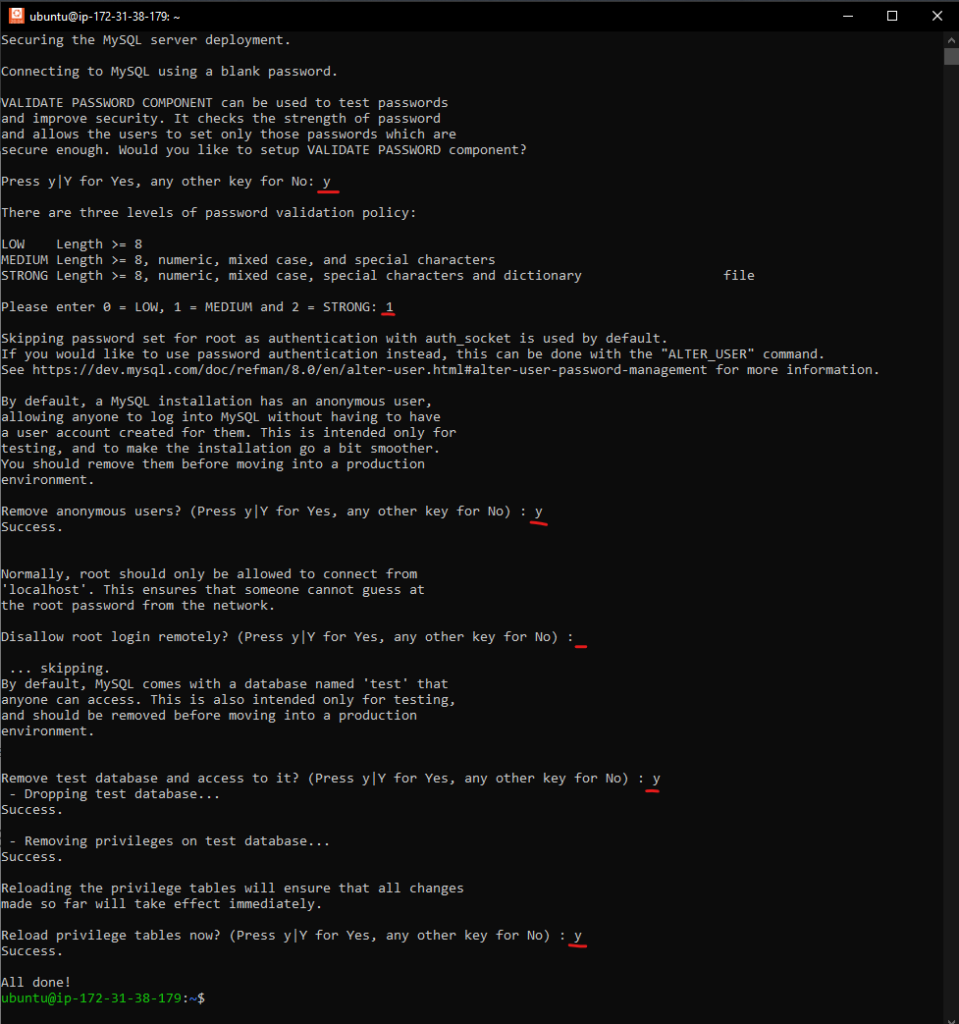
sudo mysql_secure_installation
During the process, you can choose to remove anonymous users, disallow remote root login, and remove the test database.
Step 5. Create a WordPress Database
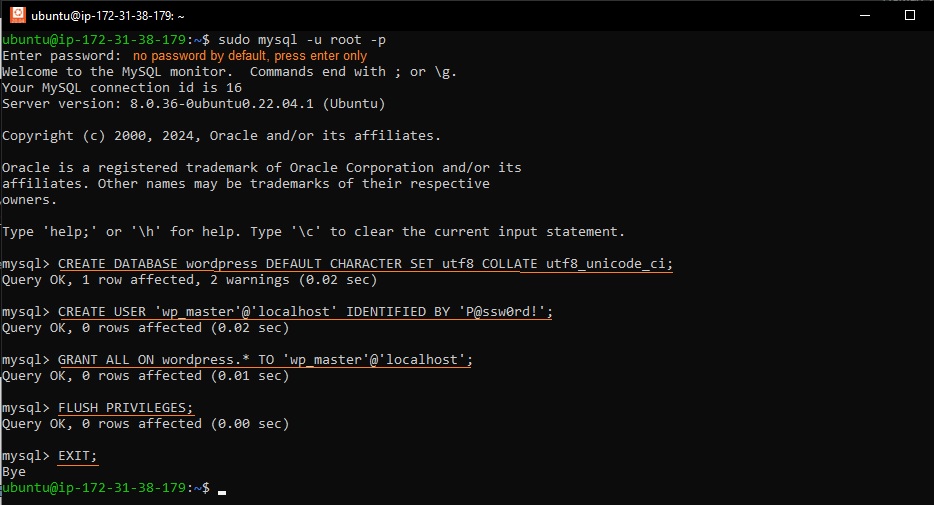
Log in to MySQL as root:
sudo mysql -u root -p
This configuration allows root login without a password. Remember to disable it before deploying your site to production for security reasons.
Create a new database and user for WordPress:
CREATE DATABASE wordpress DEFAULT CHARACTER SET utf8 COLLATE utf8_unicode_ci;
CREATE USER 'wp_master'@'localhost' IDENTIFIED BY 'P@ssw0rd!';
GRANT ALL ON wordpress.* TO 'wp_master'@'localhost';
FLUSH PRIVILEGES;
EXIT;
Please note that the username and password provided above (e.g., wp_user / P@ssw0rd!) are just examples. It’s crucial to choose unique and secure credentials when setting up your WordPress database for optimal security.
Step 6. Install PHP 8.3 and Extensions
You need to add the ppa:ondrej/php repository:
sudo add-apt-repository ppa:ondrej/php -y
Now, install new PHP 8.3 release along with its necessary extensions. These extensions are commonly used in web development projects.
sudo apt install php8.3-fpm php8.3-cli php8.3-common php8.3-mbstring php8.3-gd php8.3-intl php8.3-xml php8.3-mysql php8.3-zip php8.3-curl php8.3-tidy php8.3-imagick -y
To verify PHP version, type:
php -v
Output:
PHP 8.3.4 (cli) (built: Mar 16 2024 08:40:08) (NTS)
Copyright (c) The PHP Group
Zend Engine v4.3.4, Copyright (c) Zend Technologies
    with Zend OPcache v8.3.4, Copyright (c), by Zend Technologies
Step 7. Install WordPress using WP-CLI
Download WP-CLI using wget and move it to the bin directory to make it executable:
sudo wget https://raw.githubusercontent.com/wp-cli/builds/gh-pages/phar/wp-cli.phar -O /usr/local/bin/wp && sudo chmod +x /usr/local/bin/wp
Change to the directory where you want to install WordPress, typically your domain’s directory. If it doesn’t exist yet, create it using the command:
sudo mkdir -p /var/www/yourdomain.com
cd /var/www/yourdomain.com
Download WordPress core files using WP-CLI:
sudo wp core download --allow-root
Output:
Downloading WordPress 6.5 (en_US)...
md5 hash verified: 54c93e47eb452495c6ce03cc0c350d42
Success: WordPress downloaded.
Generate a wp-config.php file with database details:
sudo wp config create \
--dbname="wordpress" \
--dbuser="wp_master" \
--dbpass="P@ssw0rd!" \
--dbhost="localhost" \
--allow-root
Install WordPress and set up an admin account:
sudo wp core install \
--url="https://www.yourdomain.com" \
--title="YourDomain.com" \
--admin_user="admin" \
--admin_password="password" \
--admin_email="you@email.com" \
--allow-root
Please note that you can use the IP address in the URL and replace it later when your domain is ready.
Output:
Success: WordPress installed successfully.
Step 8. Configure Nginx for WordPress
Create a new configuration file for your WordPress site in /etc/nginx/sites-available/yourdomain.com:
Navigate to the directory where Nginx configuration files are stored:
cd /etc/nginx/sites-available
Use the vim command to create a new file for your site configuration (replace “yourdomain.com” with your actual domain):
sudo vim yourdomain.com
Copy and paste the following Nginx configuration into the newly created file. This configuration supports PHP 8.3:
server {
    listen 80;
    server_name yourdomain.com www.yourdomain.com;
    root /var/www/yourdomain.com;

    index index.php index.html index.htm;

    location / {
        try_files $uri $uri/ /index.php?$args;
    }

    location ~ \.php$ {
        include snippets/fastcgi-php.conf;
        fastcgi_pass unix:/run/php/php8.3-fpm.sock;
        fastcgi_param SCRIPT_FILENAME $document_root$fastcgi_script_name;
        include fastcgi_params;
    }

    location ~ /\.ht {
        deny all;
    }
}
Make sure to replace yourdomain.com with your actual domain name. Then Save and exit the file by pressing Esc then typing :wq and pressing Enter.
Finally, activate the site configuration by creating a symbolic link to the sites-enabled directory:
sudo ln -s /etc/nginx/sites-available/yourdomain.com /etc/nginx/sites-enabled/
This command will list the contents of the /etc/nginx/sites-enabled directory. If the symbolic link for your site configuration was created successfully, type the following command:
ls /etc/nginx/sites-enabled
Test the Nginx configuration for syntax errors:
sudo nginx -t
Output:
nginx: the configuration file /etc/nginx/nginx.conf syntax is ok
nginx: configuration file /etc/nginx/nginx.conf test is successful
To avoid conflicts on port 80, type the following command to remove the default nginx configuration:
rm -rf /etc/nginx/sites-enabled/default
rm -rf /etc/nginx/sites-available/default
Restart Nginx to apply the changes:
sudo systemctl restart nginx
Verify the Nginx status is running:
sudo systemctl status nginx
Step 10. Set File Permissions
This step ensures that your file permissions are correctly set up and provides additional details on securing your WordPress installation.
Navigate to your WordPress directory cd /var/www/html or replace it if its different.
Change Ownership:
Ensure that the web server (usually www-data for Nginx) owns the WordPress files. Run:
sudo chown -R www-data:www-data /var/www/html
Set the correct file permissions for the WordPress files. Run the following commands:
sudo find /var/www/html -type d -exec chmod 755 {} \;
sudo find /var/www/html -type f -exec chmod 644 {} \;
Ensure to restart your Nginx server again to apply changes to apply the changes.
sudo systemctl restart nginx
Step 11. Install SSL Certificate from Let’s Encrypt
Let’s encrypt SSL certificates provide free, automated SSL certificates. Install it using certbot:
sudo apt install certbot python3-certbot-nginx -y
Replace youdomain.com with your domain name. This command will obtain and install SSL certificate for your domain:
sudo certbot --non-interactive -m you@email.com --agree-tos --no-eff-email --nginx -d yourdomain.com -d www.yourdomain.com --redirect
Output:
Saving debug log to /var/log/letsencrypt/letsencrypt.log
Account registered.
Requesting a certificate for yourdomain.com and www.yourdomain.com

Successfully received certificate.
Certificate is saved at: /etc/letsencrypt/live/yourdomain.com/fullchain.pem
Key is saved at:         /etc/letsencrypt/live/yourdomain.com/privkey.pem
This certificate expires on 2024-07-04.
These files will be updated when the certificate renews.
Certbot has set up a scheduled task to automatically renew this certificate in the background.

Deploying certificate
Successfully deployed certificate for yourdomain.com to /etc/nginx/sites-enabled/yourdomain.com
Successfully deployed certificate for www.yourdomain.com to /etc/nginx/sites-enabled/yourdomain.com
Congratulations! You have successfully enabled HTTPS on https://yourdomain.com and https://www.yourdomain.com

- - - - - - - - - - - - - - - - - - - - - - - - - - - - - - - - - - - - - - - -
If you like Certbot, please consider supporting our work by:
 * Donating to ISRG / Let's Encrypt:   https://letsencrypt.org/donate
 * Donating to EFF:                    https://eff.org/donate-le
- - - - - - - - - - - - - - - - - - - - - - - - - - - - - - - - - - - - - - - -
Feeling tired of manual SSL renewal? Well, never again!
By default, Certbot will set up a cron job to run twice daily to automatically renew any certificates that are within 30 days of expiration. You can verify this by checking the contents of the /etc/cron.d/certbot file:
cat /etc/cron.d/certbot
You should see a line similar to this:
0 */12 * * * root test -x /usr/bin/certbot -a \! -d /run/systemd/system && perl -e 'sleep int(rand(3600))' && certbot -q renew
This line specifies that the Certbot renewal command will be run twice daily (0 */12 * * *) as the root user, checking for renewal and renewing the certificates if necessary.
That’s it! Certbot is now set up to automatically renew your SSL certificate in the background.
Your final auto generated Nginx configuration after installing the SSL via Certbot:
server {
    listen 80;
    server_name yourdomain.com www.yourdomain.com;
    return 301 https://$host$request_uri;
}

server {
    listen 443 ssl;
    server_name yourdomain.com www.yourdomain.com;
    root /var/www/yourdomain.com;
    index index.php index.html index.htm;
    location / {
        try_files $uri $uri/ /index.php?$args;
    }
    location ~ \.php$ {
        include snippets/fastcgi-php.conf;
        fastcgi_pass unix:/run/php/php8.3-fpm.sock;
        fastcgi_param SCRIPT_FILENAME $document_root$fastcgi_script_name;
        include fastcgi_params;
    }
    location ~ /\.ht {
        deny all;
    }

    ssl_certificate /etc/letsencrypt/live/yourdomain.com/fullchain.pem;
    ssl_certificate_key /etc/letsencrypt/live/yourdomain.com/privkey.pem;
    include /etc/letsencrypt/options-ssl-nginx.conf;
    ssl_dhparam /etc/letsencrypt/ssl-dhparams.pem;
}
Troubleshooting Issue
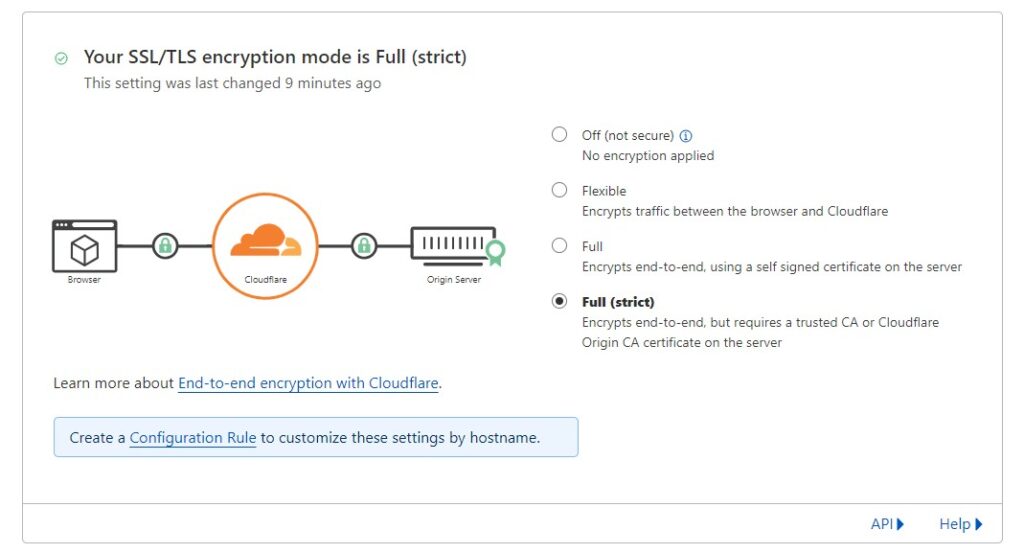
If you encounter the error “nginx config Error: Exceeded maxRedirects. Probably stuck in a redirect loop” and you use Cloudflare for your domain, try switching your SSL setting to “Full (Strict)” in Cloudflare’s dashboard. This may fix the issue:
Final Step. Complete the WordPress 2024 Installation Through the Web Interface
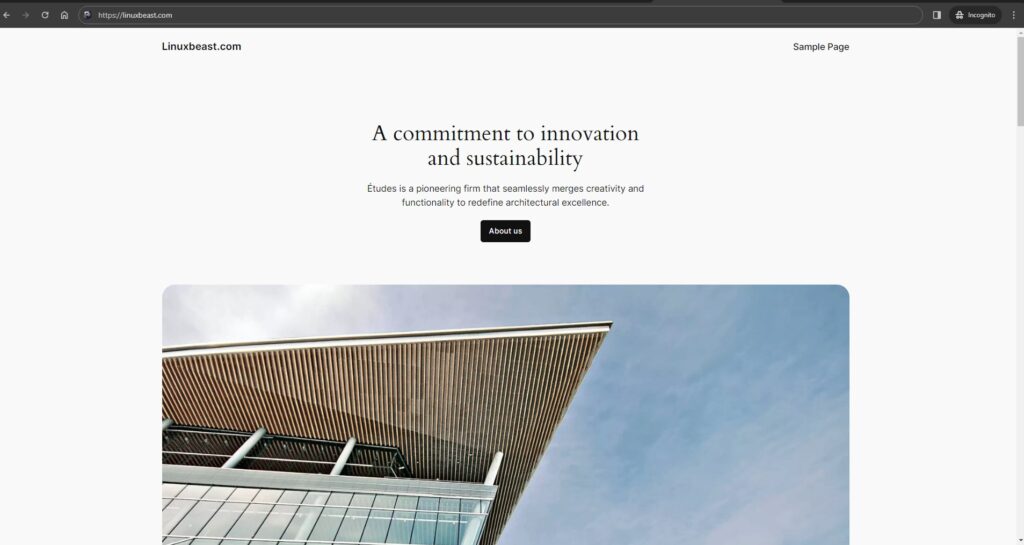
Open your web browser and navigate to your domain name (e.g. https://yourdomain.com). You should see the default WordPress themes for 2024 installed:
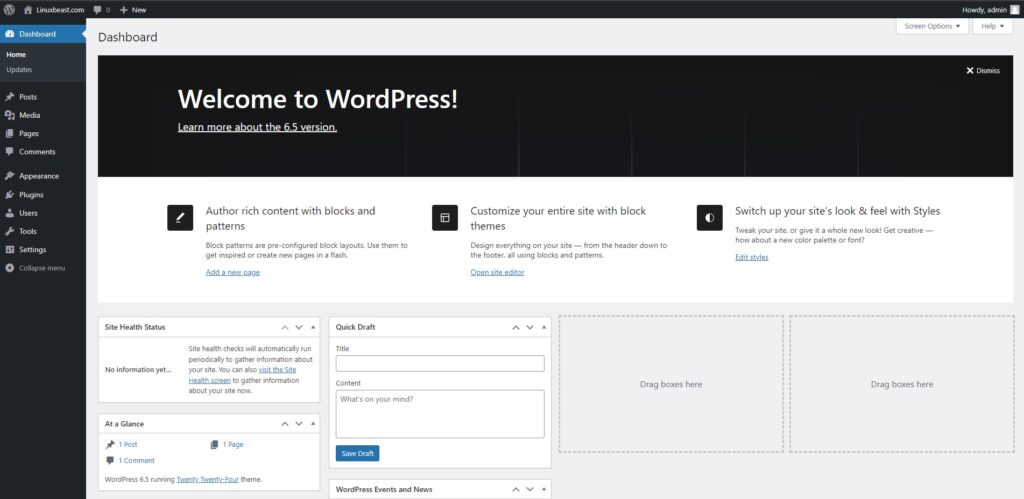
To finish the setup, log in to the WordPress admin console (e.g. https://yourdomain.com/wp-admin) and begin customizing your themes or installing your favorite plugins:
Conclusion
You’ve successfully installed WordPress on your Ubuntu 22.04 server with Nginx, PHP 8.3, SSL, and MySQL. Secure your WordPress installation further by setting up HTTPS with Let’s Encrypt, implementing security plugins, and regularly updating your WordPress themes and plugins. Enjoy your new WordPress website, hosted on your very own server!

when i tried to install a plug in word press ask ftp hostname and password i enterd host is – wordpress
ftp password is – P@ssw0rd!
ftp user name – wp_master
itried host name to local host also but word press not connecting
Hi Rejith,
Thank you for raising this issue. Good find!
Try to change the ownership of your WordPress file and directory using this command:
sudo chown -R www-data:www-data /var/www/html
Also, you can set the correct file permissions for the WordPress files. Run the following commands:
sudo find /var/www/html -type d -exec chmod 755 {} \;

sudo find /var/www/html -type f -exec chmod 644 {} \;
I added new steps for changing file ownership permissions, see Step 10 in the guide.