
Creating a swap space on an EC2 instance running Ubuntu 22.04 is an essential task when you need more virtual memory. Swap allows the system to utilize disk space to store data temporarily that the RAM can’t hold. This guide illustrates how to add swap space to your Ubuntu 22.04 instance on AWS EC2.
Purpose
The purpose of this blog post is to provide a step-by-step guide on how to add swap space on an EC2 instance running Ubuntu 22.04. This guide aims to help users manage memory efficiently, improve system performance, and prevent issues related to low memory availability.
Scope
This blog covers the following topics:
- Understanding Swap Space: Explanation of what swap space is and why it is important.
- Creating Swap Space: Step-by-step instructions to create a swap file.
- Enabling Swap Space: Commands to activate the swap file.
- Configuring Swap to Persist After Reboot: Instructions on how to edit the
/etc/fstabfile to ensure the swap file is available after a system restart.
What is Swap Space?
Swap space is a portion of the hard drive that is used as virtual memory when the physical RAM is full. It acts as an overflow area where data can be temporarily stored.
Why is it Important?
- Memory Management: Swap space helps manage memory by providing extra space when the RAM is fully utilized. This prevents applications from crashing due to insufficient memory.
- System Performance: It allows the system to handle more applications simultaneously, improving overall performance, especially for memory-intensive tasks.
- Stability: If your RAM runs out, having swap space can keep your system stable and prevent unexpected shutdowns
Step-by-Step Guide
Follow the step-by-step guide to add swap space:
Step 1: Connect to Your EC2 Instance
Before we begin, ensure you have SSH access to your instance. Use the following command to connect:
ssh -i /path/to/your-key.pem ubuntu@your-ec2-ip
Replace /path/to/your-key.pem with the path to your key file and your-ec2-ip with your instance’s IP address.
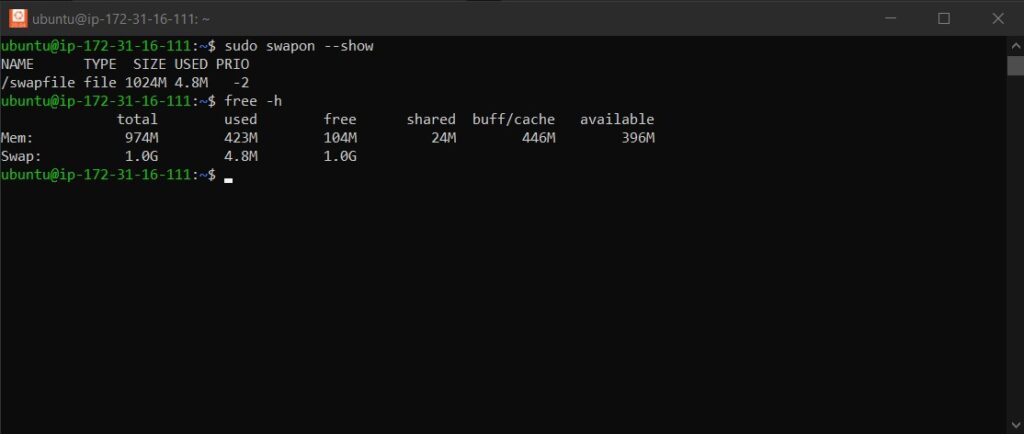
Step 2: Check the System for Swap Information
First, check if any swap files already exist:
sudo swapon --show
If nothing is returned, you do not have active swap spaces.
Additionally, inspect free memory with:
free -h
Step 3: Create a Swap File
Decide on the amount of swap space you require. As an example, let’s create a 1GB swap file:
sudo fallocate -l 1G /swapfile
After creating the file, secure it by setting correct permissions:
sudo chmod 600 /swapfile
Step 4: Set Up the Swap Space
Initialize the file as swap space:
sudo mkswap /swapfile
Then, enable the swap file:
sudo swapon /swapfile
Verify that the swap is active:
sudo swapon --show
Step 5: Make the Swap File Permanent
To ensure the swap file persists after a reboot, you need to add it to the /etc/fstab file. There are two ways to do this:
- If the
/etc/fstabfile is newly created and empty, use this command for the initial append:
echo '/swapfile none swap sw 0 0' | sudo tee -a /etc/fstab
- If the
/etc/fstabfile already contains content, use this command to avoid formatting issues:
echo -e '\n/swapfile none swap sw 0 0' | sudo tee -a /etc/fstab
This ensures the swap file is properly configured and persists after a reboot.
Step 6: Adjust Swap Settings (Optional)
Tweak the swappiness value (how often your system swaps data out of RAM) and the cache pressure behavior. The default swappiness value is 60; values closer to zero will use the swap less frequently.
Check the current swappiness value:
cat /proc/sys/vm/swappiness
Edit the swappiness value by editing the /etc/sysctl.conf file:
sudo nano /etc/sysctl.conf
Add the line at the end of the file:
vm.swappiness=10
Similarly, you can adjust the vfs_cache_pressure, which controls the tendency of the kernel to reclaim the memory which is used for caching of directory and inode objects:
vm.vfs_cache_pressure=50
Save and close the file. These settings will apply on the next reboot.
Step 7: Verify the Changes
Finally, ensure that everything is set up correctly:
sudo swapon --show
free -h
The output should now reflect your swap space settings, as shown below:
Conclusion
Finally, you have successfully added swap space to your EC2 Ubuntu 22.04 instance. This can help in situations where your instance runs out of RAM, particularly important for systems with limited memory or those running applications that are prone to memory leaks.
Remember to monitor your system’s performance and adjust the swap settings as necessary to optimize system responsiveness and stability.
Command to add to /etc/fstab needs a new line.
It will break your current fstab if not fixed.
Hi Paul, You’re absolutely right. If the /etc/fstab file containing existing content that doesn’t already have a new line at the end, appending without one could cause formatting issues and potentially break the mount points.
I’ve updated the content to include a command that ensures a new line is added before appending the swap entry if the /etc/fstab file already contains existing content.
echo -e '\n/swapfile none swap sw 0 0' | sudo tee -a /etc/fstab
This will make sure the new entry starts on a fresh line, preventing any issues. Thank you!