In this blog, we will explore the process of securing an Apache2 web server with Let’s Encrypt SSL certificates on Ubuntu 22.04, including steps for automatic renewal. This method not only enhances your website’s security by encrypting data transmission but also boosts your SEO rankings and user trust. I’ll guide you through each step process, ensuring you can set up and maintain a secure web server with ease.
Prerequisites
Before proceeding, ensure you have:
- A running instance of Ubuntu 22.04.
- Apache2 installed and hosting your domain.
- A registered domain name pointing to your server’s public IP address.
- Sudo privileges for executing administrative commands.
Step-by-Step Guide
Step 1: Update System Packages
Start by updating your system packages to the latest versions:
sudo apt update
Step 2: Install Certbot
Certbot is an automated tool that simplifies obtaining and installing SSL certificates. Install Certbot and its Apache plugin using the following commands:
sudo apt install certbot python3-certbot-apache -y
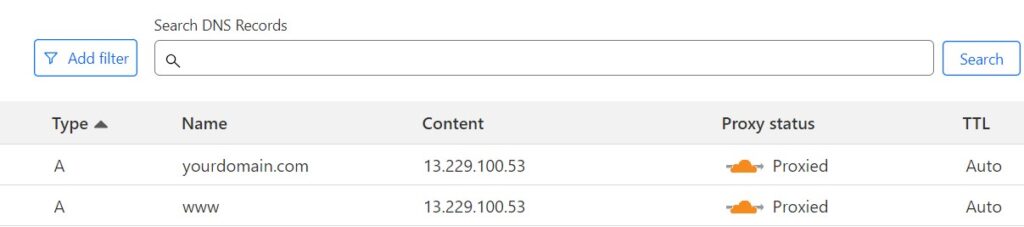
Step 3: DNS Records Configuration
Ensure that your DNS settings are correct and that your domain points to the server public IP address, as shown in the example below:
Step 4. Validate Apache Configuration
Before proceeding, double-check if your Apache configuration matches the following configuration found in the file located at /etc/apache2/site-available/yourdomain.com.conf:
<VirtualHost *:80>
    ServerAdmin admin@example.com
    DocumentRoot /var/www/yourdomain.com
    ServerName yourdomain.com
    ServerAlias www.yourdomain.com

    <Directory /var/www/yourdomain.com/>
        Options Indexes FollowSymLinks
        AllowOverride None
        Require all granted
    </Directory>

    ErrorLog ${APACHE_LOG_DIR}/error.log
    CustomLog ${APACHE_LOG_DIR}/access.log combined
</VirtualHost>
Step 5. Generate SSL Certificates
Run the following command below by replacing your@email.com with your actual email address and yourdomain.com with your registered domain name. This command obtain and installs the certificate and also configures Apache to serve your site over HTTPS:
sudo certbot --non-interactive --agree-tos --no-eff-email --apache \
-m your@email.com -d yourdomain.com -d www.yourdomain.com --redirect
Expected Output:
You should see output similar to the following, indicating that the SSL certificate was successfully obtained and deployed:
Saving debug log to /var/log/letsencrypt/letsencrypt.log
Requesting a certificate for yourdomain.com and www.yourdomain.com

Successfully received certificate.
Certificate is saved at: /etc/letsencrypt/live/yourdomain.com/fullchain.pem
Key is saved at:         /etc/letsencrypt/live/yourdomain.com/privkey.pem
This certificate expires on 2024-07-14.
These files will be updated when the certificate renews.
Certbot has set up a scheduled task to automatically renew this certificate in the background.

Deploying certificate
Successfully deployed certificate for yourdomain.com to /etc/apache2/sites-available/yourdomain.com-le-ssl.conf
Successfully deployed certificate for www.yourdomain.com to /etc/apache2/sites-available/yourdomain.com-le-ssl.conf
Congratulations! You have successfully enabled HTTPS on https://yourdomain.com and https://www.yourdomain.com

- - - - - - - - - - - - - - - - - - - - - - - - - - - - - - - - - - - - - - - -
If you like Certbot, please consider supporting our work by:
 * Donating to ISRG / Let's Encrypt:   https://letsencrypt.org/donate
 * Donating to EFF:                    https://eff.org/donate-le
- - - - - - - - - - - - - - - - - - - - - - - - - - - - - - - - - - - - - - - -
Please note that Certbot typically configures everything for you, but it’s good practice to double-check the configuration files.
Step 6: Confirming Apache Configuration
After successfully obtaining the SSL certificate, a new file named yourdomain.com-le-ssl.conf will be added, containing SSL directives. Please confirm that these directives point to the correct certificate and key files:
sudo nano /etc/apache2/sites-available/yourdomain.com-le-ssl.conf
<IfModule mod_ssl.c>
<VirtualHost *:443>
     ServerAdmin admin@example.com
     DocumentRoot /var/www/yourdomain.com
     ServerName yourdomain.com
     ServerAlias www.yourdomain.com

        <Directory /var/www/yourdomain.com/>
                Options Indexes FollowSymLinks
                AllowOverride None
                Require all granted
        </Directory>

     ErrorLog ${APACHE_LOG_DIR}/error.log
     CustomLog ${APACHE_LOG_DIR}/access.log combined

Include /etc/letsencrypt/options-ssl-apache.conf
SSLCertificateFile /etc/letsencrypt/live/yourdomain.com/fullchain.pem
SSLCertificateKeyFile /etc/letsencrypt/live/yourdomain.com/privkey.pem
</VirtualHost>
</IfModule>
Additionally, the original virtual host yourdomain.com.conf for port 80, now configured to redirect HTTP traffic to HTTPS, should look like this:
sudo nano /etc/apache2/sites-available/yourdomain.com.conf
<VirtualHost *:80>
     ServerAdmin admin@example.com
     DocumentRoot /var/www/yourdomain.com
     ServerName yourdomain.com
     ServerAlias www.yourdomain.com

        <Directory /var/www/yourdomain.com/>
                Options Indexes FollowSymLinks
                AllowOverride None
                Require all granted
        </Directory>

     ErrorLog ${APACHE_LOG_DIR}/error.log
     CustomLog ${APACHE_LOG_DIR}/access.log combined

RewriteEngine on
RewriteCond %{SERVER_NAME} =www.yourdomain.com [OR]
RewriteCond %{SERVER_NAME} =yourdomain.com
RewriteRule ^ https://%{SERVER_NAME}%{REQUEST_URI} [END,NE,R=permanent]
</VirtualHost>
Step 7. Syntax Config Tests
Check the Apache configuration for any syntax errors:
sudo apache2ctl configtest
If everything looks good, reload Apache to apply the changes:
sudo systemctl reload apache2
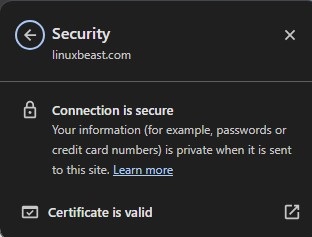
Step 8: Confirm HTTPS Configuration
Lastly, open your web browser and navigate to your website using https://yourdomain. You should see a lock icon in the address bar, indicating a secure connection.
Step 9. Automatic Renewal
By default, Certbot automatically creates a cron job that renews any expiring certificates. To confirm that the automatic renewal is set up correctly, run command:
cat /etc/cron.d/certbot
The expected output for the command cron job should look similar to this:
0 */12 * * * root test -x /usr/bin/certbot -a \! -d /run/systemd/system && perl -e 'sleep int(rand(3600))' && certbot -q renew
This means Certbot will check for certificate renewals twice daily and renew them if they are within 30 days of expiration.
Test the renewal process with a dry run:
sudo certbot renew --dry-run
Expected Output:
Saving debug log to /var/log/letsencrypt/letsencrypt.log

- - - - - - - - - - - - - - - - - - - - - - - - - - - - - - - - - - - - - - - -
Processing /etc/letsencrypt/renewal/yourdomain.com.conf
- - - - - - - - - - - - - - - - - - - - - - - - - - - - - - - - - - - - - - - -
Account registered.
Simulating renewal of an existing certificate for yourdomain.com and www.yourdomain.com

- - - - - - - - - - - - - - - - - - - - - - - - - - - - - - - - - - - - - - - -
Congratulations, all simulated renewals succeeded:
  /etc/letsencrypt/live/yourdomain.com/fullchain.pem (success)
- - - - - - - - - - - - - - - - - - - - - - - - - - - - - - - - - - - - - - - -
If this command executes without any issues, auto-renewal is set up successfully.
Conclusion ?
Your Apache2 web server on Ubuntu 22.04 now serves content over a secure HTTPS connection thanks to your Let’s Encrypt SSL certificate. Furthermore, the automatic renewal process you’ve configured means one less administrative task requiring your regular attention.
Securing your Apache2 web server with Let’s Encrypt SSL certificates on Ubuntu 22.04 is a essential step towards safeguarding your website. By following this tutorial, you have implemented robust encryption for your site, set up automatic renewal for your certificates, and ensured your users’ interactions are protected.
Remember to check your configurations occasionally and stay updated on best practices for web security.