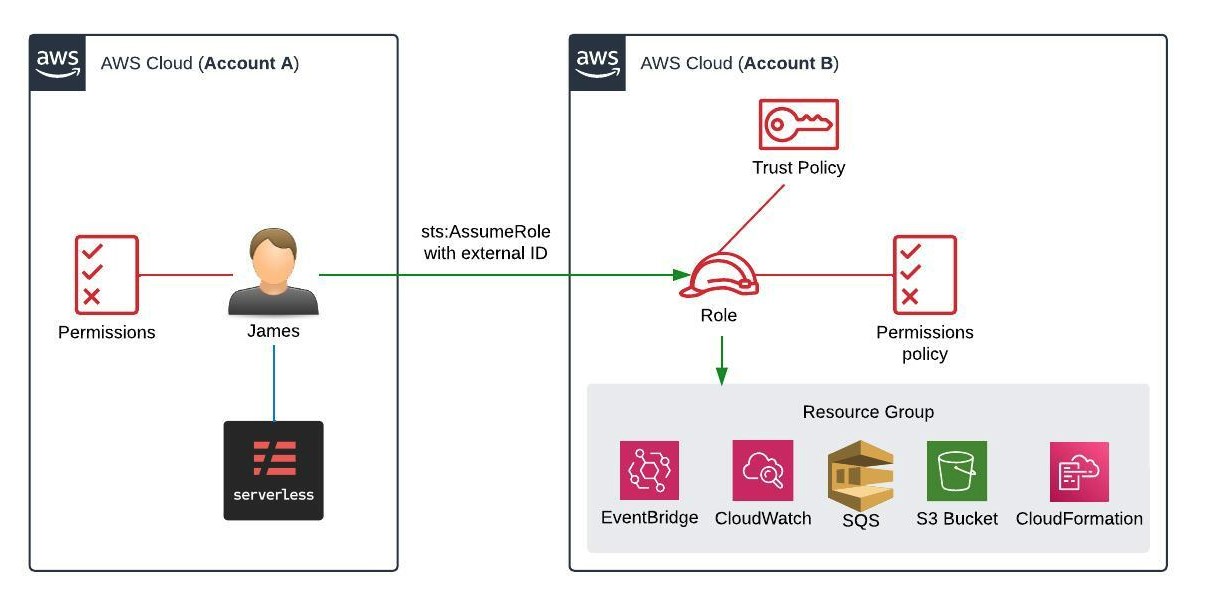
Cross-account access is an essential feature for organizations operating in the cloud that require collaboration across different AWS accounts. Utilizing the AssumeRole feature of AWS Identity and Access Management (IAM) is a secure way to delegate permissions without sharing security credentials. In this blog post, we’ll explore how you can set up cross-account access between two AWS accounts using IAM roles.
Prerequisites
Before commencing with the setup, ensure you have the following:
- Two AWS accounts: Account A (the accessing account) and Account B (the account to be accessed).
- Required permissions to create and manage IAM roles and policies on both AWS accounts.
Guide to Cross-Account Access with AssumeRole

Step 1. Create the IAM Role in Account B
The first step involves creating an IAM role in the account whose resources you want to access (Account B).
- Log into the AWS Management Console of Account B.
- Go to IAM > Roles and click on Create role.
- Select Another AWS account under the AWS account section.
- Enter the Account A’s account ID and configure MFA or other options as per your security requirements.
- Click Next: Permissions to attach a policy that will define what actions the assumed role can perform. Instead of choosing from managed policies, you can opt to create a custom policy with greater control over the allowed actions. Use the following policy as a template:
{
    "Version": "2012-10-17",
    "Statement": [
        {
            "Sid": "CrossAccountPermissions",
            "Effect": "Allow",
            "Action": [
                "s3:*",
                "cloudwatch:*",
                "cloudformation:*",
                "sqs:*",
                "events:*"
            ],
            "Resource": "*"
        }
    ]
}
- You can add tags to describe the role and proceed to review your settings.
- Give the role a meaningful name like
CrossAccountAccessRole, and create the role after reviewing the details.
Step 2. Establish Trust Relationship
This step involves modifying the trust relationship to allow Account A to assume the role.
- Within the newly created IAM role, go to the Trust relationships tab.
- Click on Edit trust relationship and update the policy document to include Account A’s information:
{
  "Version": "2012-10-17",
  "Statement": [
    {
      "Effect": "Allow",
      "Principal": {
        "AWS": "arn:aws:iam::[AccountA-ID]:root"
      },
      "Action": "sts:AssumeRole"
    }
  ]
}- Replace
[AccountA-ID]with the actual account ID of Account A. - Save the updates made to the trust relationship.
Step 3. Use AssumeRole from Account A
Switch to Account A to configure access to Account B.
- Create an IAM user or group within Account A with the required permissions to call assume the role on Account B. Ensure the following policy is attached, allowing them to assume the specific role:
{
    "Version": "2012-10-17",
    "Statement": [
        {
            "Effect": "Allow",
            "Action": [
               "sts:AssumeRole",
               "iam:PassRole",
               "iam:ListRoles"
            ],
            "Resource": "arn:aws:iam::[AccountB-ID]:role/CrossAccountAccessRole"
        }
    ]
}- Ensure you replace
[AccountB-ID]with the actual account ID of Account B and changeCrossAccountAccessRoleto the name of the role created in Account B.
Step 4. Utilizing AssumeRole to Access Resources
After setting up the roles and policies, you can now assume the role and access resources in Account B from Account A.
- Download and configure the AWS IAM User Credentials from Account A onto the system where you plan to execute the assume role command.
- Use the AWS CLI to assume the role in Account B with the following command:
aws sts assume-role --role-arn "arn:aws:iam::[AccountB-ID]:role/CrossAccountAccessRole" --role-session-name AWSCLI-Session --external-id 12345678TESTID
Replace [AccountB-ID] with the actual account ID of Account B.
- Configure the received access key ID, secret access key, and session token as environment variables:
export AWS_ACCESS_KEY_ID=RoleAccessKeyID
export AWS_SECRET_ACCESS_KEY=RoleSecretKey
export AWS_SESSION_TOKEN=RoleSessionToken
- To facilitate seamless deployment and role assumption, consider creating a Bash script:
#!/bin/sh

OUT=$(aws sts assume-role --role-arn "arn:aws:iam::[AccountB-ID]:role/CrossAccountAccessRole" --role-session-name AWSCLI-Session --external-id 12345678TESTID);\
export AWS_ACCESS_KEY_ID=$(echo $OUT | jq -r '.Credentials.AccessKeyId');\
export AWS_SECRET_ACCESS_KEY=$(echo $OUT | jq -r '.Credentials.SecretAccessKey');\
export AWS_SESSION_TOKEN=$(echo $OUT | jq -r '.Credentials.SessionToken');

# Deploy to AWS cloud using the serverless framework
npm run deploy
Remember to replace [AccountB-ID] with the actual account ID of Account B in your script.
- Your
package.jsonshould define the deploy script used in the automation process:
{
    "name": "cross-account-sls",
    "version": "1.0.0",
    "description": "Infrastructure as code (IaC) for cross account among microservices",
    "devDependencies": {
        "serverless": "^3.23.0",
        "serverless-python-requirements": "^6.0.0"
    },
    "scripts": {
        "deploy": "sls deploy --stage develop --force --verbose"
    }
}
Make sure Node.js and npm are installed on your local machine as they’re required for the deployment command to work.
Conclusion
By automating these processes, organizations can streamline their deployment workflows and maintain high security standards when working with multiple AWS accounts.

