Securing your web server is crucial to protect data and maintain the trust of your visitors. In this tutorial, we will guide you through the process of securing an NGINX server with a free SSL/TLS certificate from Let’s Encrypt on Ubuntu 22.04.
Prerequisites
Before we begin, make sure you have:
- A running Ubuntu 22.04 server.
- A domain name pointed to your server’s public IP address.
- NGINX installed on your server.
Step 1: Installing Certbot
Certbot is an open-source tool that simplifies the process of obtaining and renewing Let’s Encrypt SSL certificates. For more details about Certbot, please visit: here
To install Certbot and its Nginx plugin, use the following commands:
sudo apt update
sudo apt install certbot python3-certbot-nginx -y
Step 2: Acquiring the SSL Certificate
Ensure your domain is pointing to your server’s IP address, as verification is required in obtaining an SSL certificate.

You should verify if your Nginx configuration file for port 80 aligns with the following configuration below:
server {
    listen 80;
    server_name yourdomain.com www.yourdomain.com;
    root /var/www/yourdomain.com;

    index index.php index.html index.htm;

    # Additional configuration...
}
Replace yourdomain.com with your registered domain name, then use the following command to obtain and install the SSL certificate:
sudo certbot --non-interactive -m you@email.com --agree-tos --no-eff-email --nginx -d yourdomain.com -d www.yourdomain.com --redirect
Upon executing this command, Certbot will run and perform all necessary tasks to validate and configure SSL for your domains.
Expected Output:
After the installation is complete, Certbot will provide output similar to the following:
Saving debug log to /var/log/letsencrypt/letsencrypt.log
Account registered.
Requesting a certificate for yourdomain.com and www.yourdomain.com
Successfully received certificate.
Certificate is saved at: /etc/letsencrypt/live/yourdomain.com/fullchain.pem
Key is saved at:         /etc/letsencrypt/live/yourdomain.com/privkey.pem
This certificate expires on 2024-07-04.
These files will be updated when the certificate renews.
Certbot has set up a scheduled task to automatically renew this certificate in the background.
Deploying certificate
Successfully deployed certificate for yourdomain.com to /etc/nginx/sites-enabled/yourdomain.com
Successfully deployed certificate for www.yourdomain.com to /etc/nginx/sites-enabled/yourdomain.com
Congratulations! You have successfully enabled HTTPS on https://yourdomain.com and https://www.yourdomain.com
- - - - - - - - - - - - - - - - - - - - - - - - - - - - - - - - - - - - - - - -
If you like Certbot, please consider supporting our work by:
 * Donating to ISRG / Let's Encrypt:   https://letsencrypt.org/donate
 * Donating to EFF:                    https://eff.org/donate-le
- - - - - - - - - - - - - - - - - - - - - - - - - - - - - - - - - - - - - - - -
Step 3: Verifying Nginx Configuration
Certbot should automatically modify your Nginx configuration files. It’s always a good practice to double-check the generated settings:
Review your domain’s Nginx configuration file:
sudo nano /etc/nginx/sites-available/yourdomain.com
Confirm that it includes pointers to the SSL certificate and key:
server {
    listen 443 ssl;
    server_name yourdomain.com www.yourdomain.com;
    root /var/www/yourdomain.com;
    index index.php index.html index.htm;

    # Additional configuration...

    ssl_certificate /etc/letsencrypt/live/yourdomain.com/fullchain.pem;
    ssl_certificate_key /etc/letsencrypt/live/yourdomain.com/privkey.pem;
    include /etc/letsencrypt/options-ssl-nginx.conf;
    ssl_dhparam /etc/letsencrypt/ssl-dhparams.pem;
}
Ensure HTTP traffic is redirected to HTTPS:
server {
    listen 80;
    server_name yourdomain.com www.yourdomain.com;

    return 301 https://$host$request_uri;
}
Validate the Nginx configuration:
sudo nginx -t
If no issues are detected, reload Nginx to activate the changes:
sudo systemctl reload nginx
Step 4: Verify HTTPS
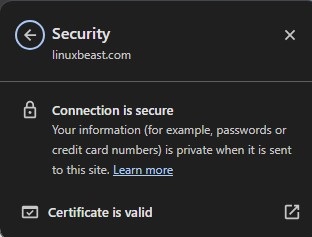
Open your web browser and navigate to https://your_domain.com. Check for a padlock icon indicating a secure connection.

Step 5: Configuring Automatic Renewal
By default, Certbot automatically creates a cron job that renews any expiring certificates. To confirm that the automatic renewal is set up:
cat /etc/cron.d/certbot
The cron job should look similar to this:
0 */12 * * * root test -x /usr/bin/certbot -a \! -d /run/systemd/system && perl -e 'sleep int(rand(3600))' && certbot -q renew
This means Certbot will check for certificate renewals twice daily and renew them if they are within 30 days of expiration.
Test the renewal process with a dry run:
sudo certbot renew --dry-run
If this command executes without any issues, auto-renewal is set up successfully.
Conclusion
Congratulations! Your NGINX server is now secured with Let’s Encrypt. It’s important to regularly check your domain’s SSL/TLS status and keep your server packages updated to maintain security.
Always remember to backup your server and configurations before making significant changes, and consult the Let’s Encrypt documentation for more detailed information.
For tutorial on securing your Apache version with Let’s Encrypt, please visit: How to Secure Apache2 with Let’s Encrypt on Ubuntu 22.04
I hope this tutorial assists you in enhancing your website’s security. Stay safe and encrypted!

