Installing MongoDB Community Edition on an EC2 Ubuntu 22.04 instance is ideal for startup and development purposes. It allows you to establish a scalable and flexible database solution for your applications, promoting efficient data storage, retrieval, and management within a cloud environment.
What to do
- Add MongoDB public key to your system
- Add the MongoDB repository
- Update your package lists to include the MongoDB repository
- Install MongoDB Community Edition
- Start and enable MongoDB service
- Verify MongoDB installation
- Access MongoDB using shell and Compass
Prerequisites
- An Amazon EC2 instance running Ubuntu 22.04 LTS.
- Proper permissions to access the instance via SSH.
Let’s get started!
Step 1: Connect to Your EC2 Instance
First, connect to your EC2 instance using SSH:
ssh -i /path/to/your-key.pem ubuntu@your-ec2-instance-public-dns
Replace /path/to/your-key.pem with the path to your key file, and your-ec2-instance-public-dns with your EC2 instance’s public DNS.
Step 2: Update Your Packages
Always start by updating your package list:
sudo apt update
Step 3: Import the MongoDB Repository GPG Key
MongoDB is not included in the default Ubuntu repositories. We need to import the GPG key for the official MongoDB repository:
sudo apt-get install gnupg curl
curl -fsSL https://www.mongodb.org/static/pgp/server-7.0.asc | sudo gpg --dearmor -o /usr/share/keyrings/mongodb-server-7.0.gpg
Step 4: Add the MongoDB Repository
Now add the MongoDB repository:
echo "deb [ arch=amd64,arm64 signed-by=/usr/share/keyrings/mongodb-server-7.0.gpg ] https://repo.mongodb.org/apt/ubuntu jammy/mongodb-org/7.0 multiverse" | sudo tee /etc/apt/sources.list.d/mongodb-org-7.0.list
Step 5: Reload Local Package Database
Update your package database to reflect the newly added repository:
sudo apt-get update
Step 6: Install MongoDB
Install the latest version of MongoDB:
sudo apt install -y mongodb-org
Optionally, you can prevent unintended upgrades by pinning the MongoDB package:
echo "mongodb-org hold" | sudo dpkg --set-selections
Step 7: Start the MongoDB Service
After installation, start MongoDB and enable it to start on boot:
sudo systemctl start mongod
sudo systemctl enable mongod
Step 8: Verify the Installation
Check the status of the MongoDB service to ensure it’s up and running:
sudo systemctl status mongod
If you see an active (running) status, that means MongoDB is successfully installed.
Step 9: Configure MongoDB (Optional)
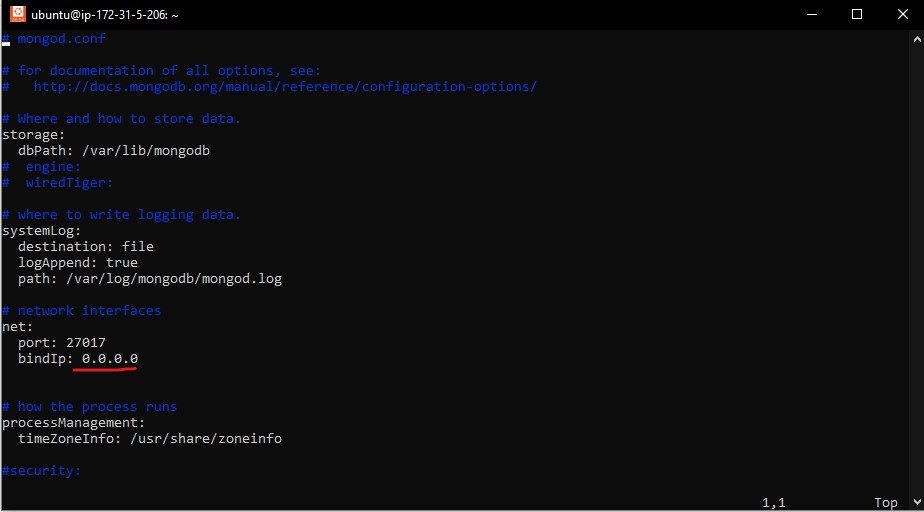
To further configure your MongoDB installation, edit the MongoDB configuration file at /etc/mongod.conf. For example, if you need to adjust the IP binding or port, you can modify this file accordingly.

bindIp to 0.0.0.0, MongoDB will listen for connections from all network interfaces, including external ones.Step 10: Access MongoDB Shell
You can now interact with MongoDB using the shell:
mongosh
Testing the MongoDB Installation
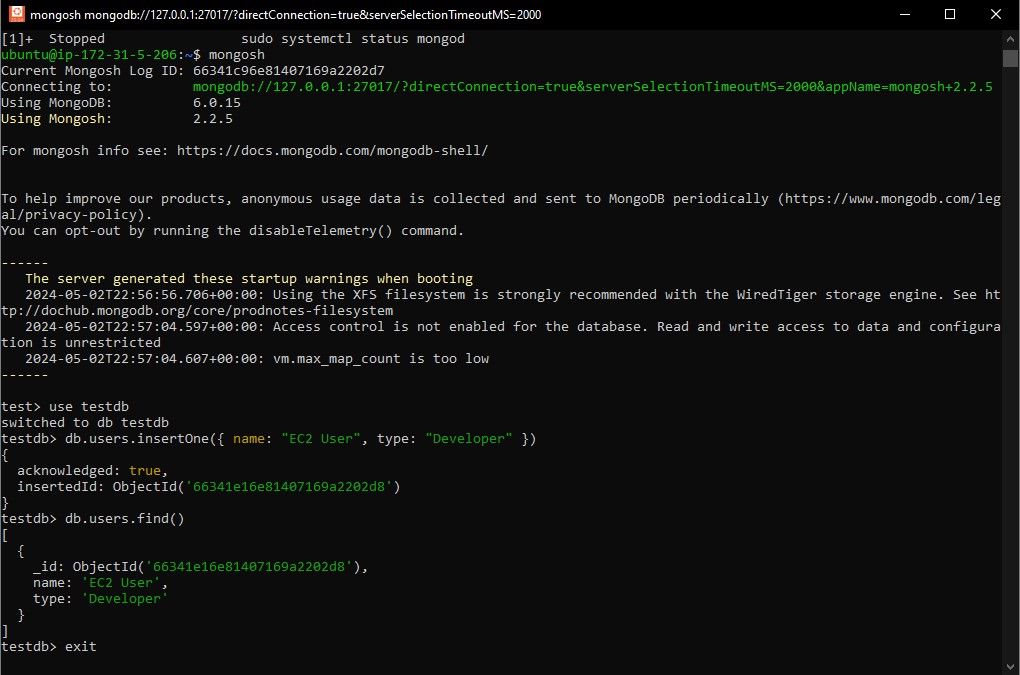
Once inside the MongoDB shell, create a test database and insert some data as follows:
Create a new database named “testdb“:
use testdb
Insert a new document into the “users” collection:
db.users.insertOne({ name: "EC2 User", type: "Developer" })Retrieve the document to confirm it’s stored:
db.users.find()
If you see similar output on the screenshot below, congratulations! MongoDB is properly set up on your EC2 instance.

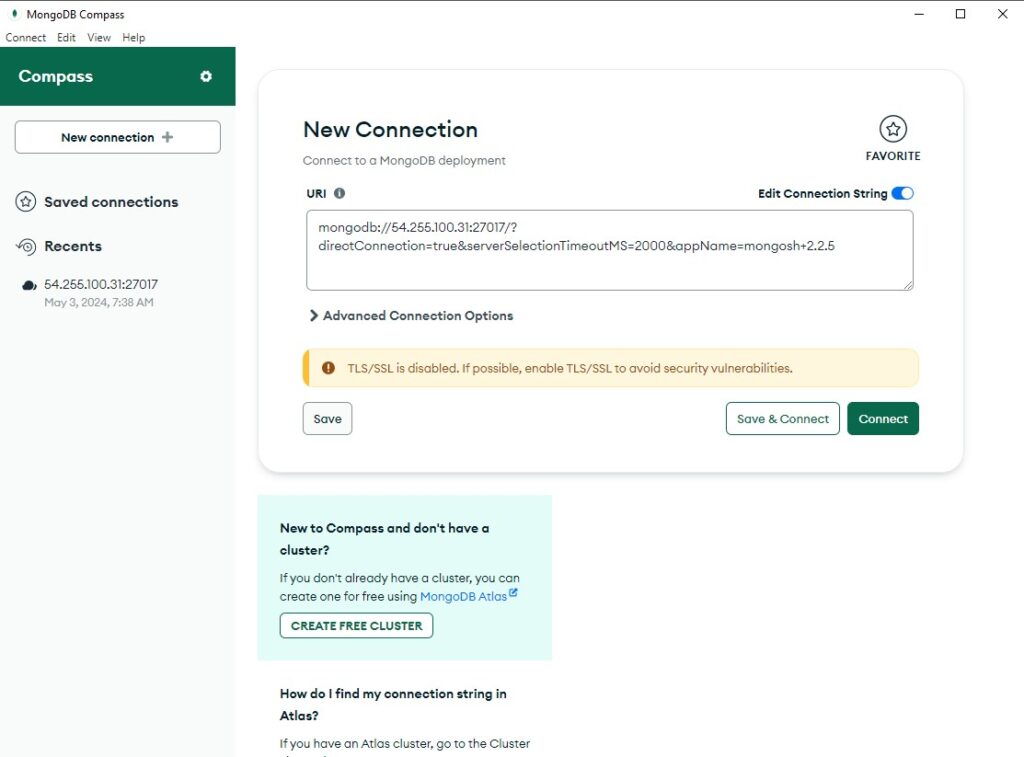
Download MongoDB Compass
You can download MongoDB Compass, an optional tool, to easily connect to your MongoDB via a user-friendly UI as shown below:

Make sure to allow inbound access to port 27017/tcp from your EC2 security group to enable external access.
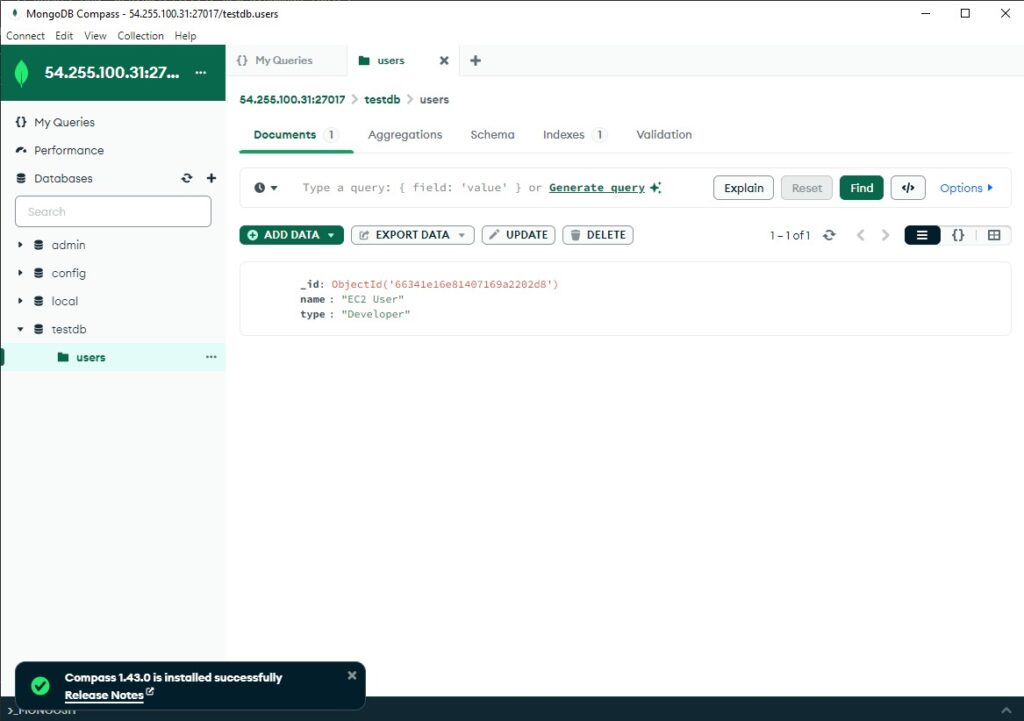
Below is an example of the data collection we performed earlier during testing using the command line on shell.

Securing MongoDB
By default, MongoDB is unsecured, which means you should take extra steps to secure it, especially if your database will be accessible over the internet:
- Enable authentication and create administrative users.
- Use Encryption at Rest to protect data on disk.
- Implement network encryption to secure data in transit.
For security best practices, please refer to MongoDB Security Checklist.
Final Step. Uninstall MongoDB Community Edition
If MongoDB Community Edition is no longer needed, you can uninstall it by performing following commands.
Stop MongoDB before uninstalling:
sudo systemctl stop mongod
Purge installed MongoDB packages:
sudo apt-get purge mongodb-org*
Delete databases and log files:
sudo rm -r /var/log/mongodb
sudo rm -r /var/lib/mongodb
Conclusion
This guide covers the installation of MongoDB Community Edition on an Ubuntu 22.04 instance in AWS EC2. Remember to secure your MongoDB installation, especially if it will be accessible from a public IP address. Always back up configurations and data prior to making significant changes to the database server.
Enjoy building with MongoDB on your AWS cloud infrastructure!

