Before opening a pull request, you’ll often want to squash multiple commits into one clean commit. Instead of doing this entirely from the command line, you can use GitLens in VS Code to run an interactive rebase with a visual UI. This guide shows you how to combine all commits into one using GitLens interactive rebase.
The examples in this guide are run on WSL2 Ubuntu in Windows with VS Code connected via the WSL extension, but this works the same on any platform.
When to Squash Commits
You might need this when:
- Your feature branch has “WIP”, “fix typo”, or “oops” commits that don’t belong in the main history
- A reviewer asks you to clean up your commit history before merging
- You want one meaningful commit per feature instead of 15 incremental ones
Prerequisites
- VS Code with the GitLens extension installed
- A Git repository with multiple commits on your current branch that you want to combine
Step 1: Find the Base Commit Hash
First, identify the commit before the ones you want to squash. Open the VS Code integrated terminal (Ctrl+`) and run:
git log --onelineThis shows your commit history with short hashes. Find the commit that comes before your first commit to squash. Copy its hash — you’ll need it in the next step.
For example, if your branch has these commits:
a1b2c3d fix: button alignment
e4f5g6h add: login form validation
i7j8k9l add: login page UI
m0n1o2p initial setup
To squash the top three commits into one, you need the hash of m0n1o2p (the commit before the ones you want to combine).
Step 2: Start the Interactive Rebase
Run the interactive rebase command with the base commit hash:
git rebase -i m0n1o2pOr use the caret to reference one commit before your target:
git rebase -i i7j8k9l^The ^ means “the parent of this commit”.
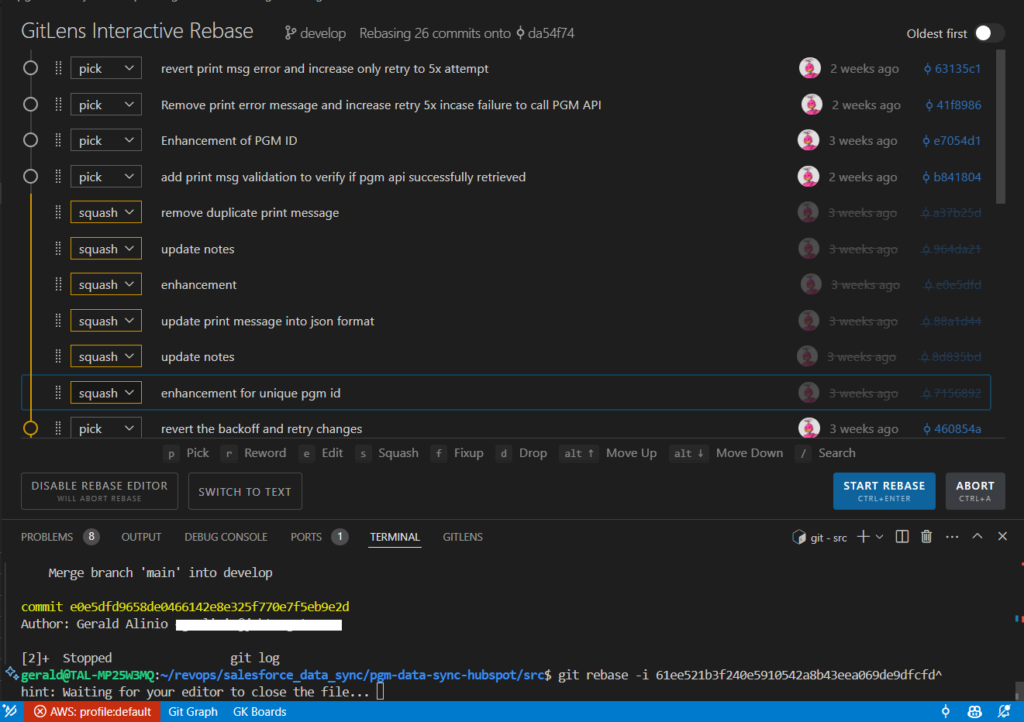
Because you have GitLens installed, VS Code will open the GitLens Interactive Rebase Editor instead of a text-based editor. This is the visual UI where you’ll configure the squash.
Step 3: Squash the Commits in the GitLens UI
The GitLens rebase editor shows your commits in chronological order (oldest at the top). Each commit has a dropdown action that defaults to pick.
To squash all commits into the first one:
- Leave the first commit (oldest) set to
pick— this is the one you’re squashing into - For every subsequent commit, click the dropdown and change it from
picktosquash - Click the Start Rebase button at the top of the editor
The squash option combines a commit into the one above it while keeping both commit messages. If you don’t need the intermediate messages at all, use fixup instead — it squashes the commit and discards its message.
Step 4: Edit the Commit Message
After clicking Start Rebase, VS Code opens a commit message editor. If you used squash, it shows all the combined commit messages. Edit this into a single, clear commit message that describes the full change.
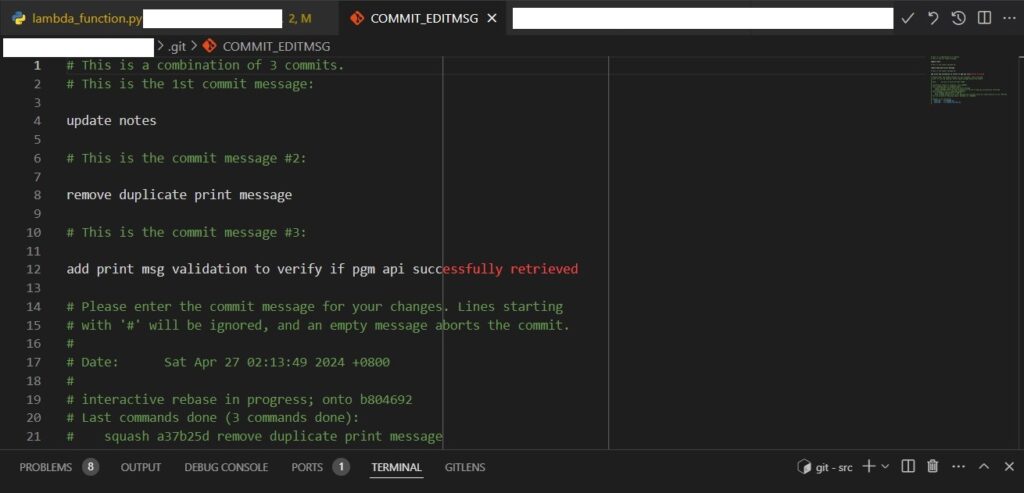
Save and close the file to complete the rebase.
Step 5: Push the Squashed Commit
Since you rewrote the commit history, a normal git push will be rejected. You need to force push:
git push --force-with-lease origin your-branch-nameUse --force-with-lease instead of --force. It does the same thing but stops the push if someone else has pushed to the branch since your last pull — protecting you from overwriting their work.
Only force push to your own feature branches. Never force push to main or shared branches.
Alternative: Squash from the Command Line
If you prefer the terminal over the GitLens UI, you can do the same thing with a soft reset:
git reset --soft m0n1o2p
git commit -m "add: login page with form validation"
git reset --soft— moves the branch pointer back to the base commit but keeps all changes stagedgit commit— creates a single new commit with all the staged changes
This is faster if you don’t need to pick individual commits to keep or drop. If you have uncommitted changes you want to preserve first, see Safety Moving Uncommitted Changes to A New Branch in Git.
Conclusion
Your feature branch now has a clean, single commit ready for review. GitLens makes interactive rebase visual and less error-prone than editing the rebase todo file by hand. For other Git workflow tips, see How to Merge Branches in Git Without Auto-Resolving Conflicts and How to Configure Git Pushes Without Authentication Prompts.