 Linuxbeast Developer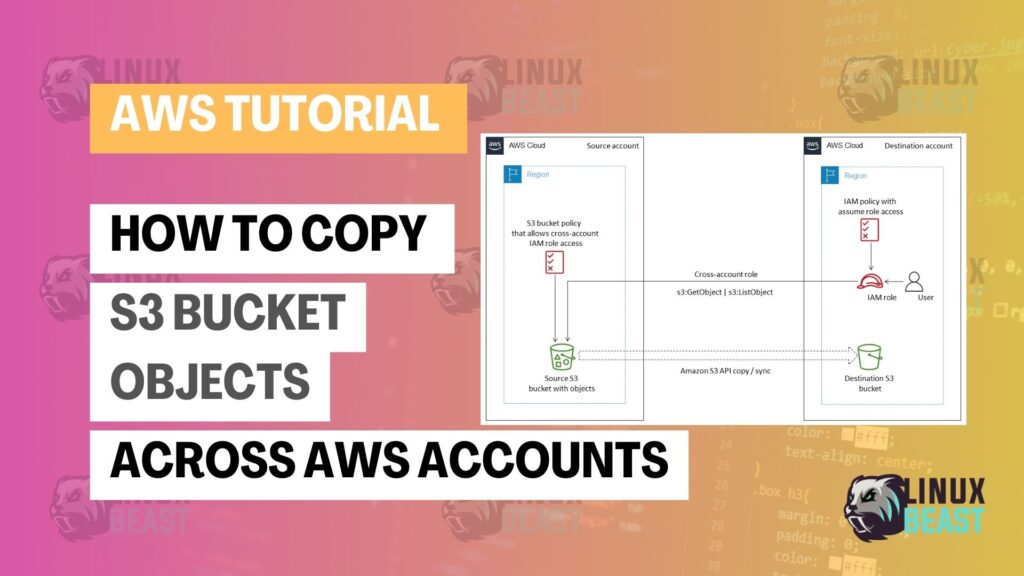
When you manage multiple AWS accounts, you’ll eventually need to copy S3 bucket objects across AWS accounts — for data migrations, backups, or sharing data between environments. This guide covers two approaches: a simple bucket policy method and an AssumeRole method for tighter access control.
The examples here are run on WSL2 Ubuntu in Windows, but the AWS CLI commands work the same on any system.
Prerequisites
- AWS CLI v2 installed and configured with profiles for both accounts
- The source bucket name and the destination bucket name
- IAM permissions to modify bucket policies (source account) and write to S3 (destination account)
In the examples below:
- Account A (111111111111) — source account, owns the bucket with the data
- Account B (222222222222) — destination account, where you want to copy the data
Method 1: Bucket Policy (Simplest)
This is the fastest approach. You add a policy to the source bucket that grants Account B read access, then run aws s3 sync from Account B.
1. Add a bucket policy on the source bucket (Account A)
In Account A, add this bucket policy to allow Account B to list and read objects:
{
    "Version": "2012-10-17",
    "Statement": [
        {
            "Effect": "Allow",
            "Principal": {
                "AWS": "arn:aws:iam::222222222222:root"
            },
            "Action": [
                "s3:ListBucket"
            ],
            "Resource": "arn:aws:s3:::source-bucket"
        },
        {
            "Effect": "Allow",
            "Principal": {
                "AWS": "arn:aws:iam::222222222222:root"
            },
            "Action": [
                "s3:GetObject"
            ],
            "Resource": "arn:aws:s3:::source-bucket/*"
        }
    ]
}
Note that s3:ListBucket applies to the bucket ARN (no /*), while s3:GetObject applies to the objects ARN (with /*). Mixing these up is a common cause of AccessDenied errors.
2. Grant S3 permissions in the destination account (Account B)
The IAM user or role in Account B that runs the copy command needs permission to read from the source bucket and write to the destination bucket. Attach this policy:
{
    "Version": "2012-10-17",
    "Statement": [
        {
            "Effect": "Allow",
            "Action": [
                "s3:ListBucket",
                "s3:GetObject"
            ],
            "Resource": [
                "arn:aws:s3:::source-bucket",
                "arn:aws:s3:::source-bucket/*"
            ]
        },
        {
            "Effect": "Allow",
            "Action": [
                "s3:ListBucket",
                "s3:PutObject",
                "s3:PutObjectAcl"
            ],
            "Resource": [
                "arn:aws:s3:::destination-bucket",
                "arn:aws:s3:::destination-bucket/*"
            ]
        }
    ]
}
3. Copy the objects from Account B
From Account B, sync the entire source bucket to the destination:
aws s3 sync s3://source-bucket s3://destination-bucket --profile account-bTo copy a single object or a prefix:
aws s3 cp s3://source-bucket/data/export.csv s3://destination-bucket/data/export.csv --profile account-baws s3 sync s3://source-bucket/logs/2025/ s3://destination-bucket/logs/2025/ --profile account-bFixing Object Ownership
By default, when Account B copies objects from Account A’s bucket, Account A still owns the objects — even though they’re now in Account B’s bucket. This means Account B may not be able to read or manage the copied objects.
The fix depends on whether the destination bucket uses Bucket owner enforced (the default for new buckets) or the legacy ACL model:
New buckets (Bucket owner enforced — default)
If the destination bucket was created with the default settings (ACLs disabled, “Bucket owner enforced”), Account B automatically owns all objects written to the bucket. No extra flags needed.
Older buckets (ACLs enabled)
If the destination bucket has ACLs enabled, add the --acl bucket-owner-full-control flag to transfer ownership:
aws s3 sync s3://source-bucket s3://destination-bucket \
  --acl bucket-owner-full-control \
  --profile account-b
This grants Account B full control over the copied objects. Without this flag on ACL-enabled buckets, the objects belong to Account A and Account B can’t access them.
Method 2: AssumeRole
If you can’t modify the source bucket policy (maybe you don’t have admin access to Account A), use AssumeRole instead. Account A creates a role that Account B can assume, and Account B runs the copy using that role’s temporary credentials.
This approach is covered in detail in How to Set Up Cross-Account Access in AWS with AssumeRole. The short version:
- Account A creates an IAM role with S3 read permissions and a trust policy allowing Account B
- Account B adds a profile in
~/.aws/configthat assumes the role - Account B runs the sync using that profile
Add this to ~/.aws/config in Account B:
[profile account-a-s3-reader]
role_arn = arn:aws:iam::111111111111:role/S3CrossAccountReader
source_profile = account-b
Then run the sync using the assumed role profile to read from Account A, and write to Account B’s bucket:
aws s3 sync s3://source-bucket s3://destination-bucket --profile account-a-s3-readerVerify the Transfer
List the destination bucket and compare object counts:
aws s3 ls s3://source-bucket --recursive --summarize --profile account-a-s3-reader
aws s3 ls s3://destination-bucket --recursive --summarize --profile account-b
The --summarize flag shows the total number of objects and size at the end of the output. Both counts should match.
Troubleshooting
| Error | Cause |
|---|---|
AccessDenied on ListBucket |
The bucket policy is missing s3:ListBucket on the bucket ARN (without /*) |
AccessDenied on GetObject |
The bucket policy is missing s3:GetObject on the objects ARN (with /*) |
| Objects copied but can’t be read in destination | Object ownership issue — use --acl bucket-owner-full-control or enable “Bucket owner enforced” on the destination bucket |
KMS.AccessDeniedException |
Source objects are encrypted with a KMS key. Add kms:Decrypt permission for the source key and kms:GenerateDataKey for the destination key |
| Copy is slow for many small files | Use aws s3 sync instead of aws s3 cp --recursive — sync skips files that already exist and haven’t changed |
Conclusion
For most cases, the bucket policy method is all you need — add a policy to the source bucket, then aws s3 sync from the destination account. Use AssumeRole when you can’t modify the source bucket policy or need stricter access control.
For other cross-account patterns, see How to Access AWS Secrets Manager from Another Account or Setting Up Cross-Account S3 Upload with Lambda.