If you have PostgreSQL running in WSL Ubuntu and want a GUI to manage it, pgAdmin 4 is the standard tool for the job. The trick is that pgAdmin runs on Windows while PostgreSQL runs inside WSL — so you need to configure PostgreSQL to accept connections from outside WSL and point pgAdmin to the right IP address.
This guide walks you through connecting pgAdmin 4 on Windows to a PostgreSQL instance in WSL Ubuntu.
Prerequisites
- PostgreSQL installed and running in WSL Ubuntu — follow How to Install PostgreSQL on WSL Ubuntu 22.04 if you need to set this up
- Windows 10 or 11 with WSL2 and Ubuntu installed
Step 1: Install pgAdmin 4 on Windows
Download pgAdmin 4 from the official site: pgadmin.org/download. Install it on Windows, not inside WSL. pgAdmin is a desktop app — it runs on the Windows side and connects to PostgreSQL over the network.
Run through the installer with the defaults. Once installed, open pgAdmin from the Start menu. On first launch it’ll ask you to set a master password — this is just for pgAdmin’s own saved credentials, not your PostgreSQL password.
Step 2: Configure PostgreSQL to Accept External Connections
By default, PostgreSQL only listens on localhost inside WSL. Since pgAdmin is running on the Windows host (technically a different machine from WSL’s perspective), you need to tell PostgreSQL to listen on all network interfaces.
Edit postgresql.conf
Find your PostgreSQL config file. For PostgreSQL 14 on Ubuntu 22.04:
sudo nano /etc/postgresql/14/main/postgresql.confIf you installed a different version, replace 14 with your version number (check with pg_lsclusters).
Find the line that says listen_addresses (it’s usually commented out near the top) and change it to:
listen_addresses = '*'Make sure you remove the # at the beginning of the line if it’s commented out. The * means PostgreSQL will accept connections on all network interfaces, not just localhost.
Edit pg_hba.conf
This file controls who is allowed to connect and how they authenticate. Open it:
sudo nano /etc/postgresql/14/main/pg_hba.confAdd this line at the end of the file to allow password-based connections from any IP address:
# Allow connections from Windows host (pgAdmin)
host    all    all    0.0.0.0/0    md5
Here’s what each column means:
host— TCP/IP connection (not local socket)all— any databaseall— any user0.0.0.0/0— any IP addressmd5— require password authentication
This is fine for local development. For anything beyond that, you’d want to restrict the IP range instead of using 0.0.0.0/0.
Restart PostgreSQL
sudo service postgresql restartVerify it’s running:
sudo service postgresql statusStep 3: Get Your WSL IP Address
pgAdmin on Windows needs to know the IP address of your WSL instance. Get it with:
hostname -IThis returns something like 172.20.x.x. Copy that IP — you’ll need it in the next step.
Heads up: The WSL IP address changes every time you restart WSL or reboot your Windows machine. So if pgAdmin can’t connect after a restart, run hostname -I again and update the server connection in pgAdmin.
Alternative: Use localhost (WSL2 with mirrored networking)
If you’re on a recent Windows 11 build, you can enable mirrored networking mode in WSL2 so that localhost from Windows reaches WSL directly. Add this to your %USERPROFILE%\.wslconfig file on the Windows side:
[wsl2]
networkingMode=mirrored
Then restart WSL with wsl --shutdown from PowerShell. After this, you can use localhost instead of the WSL IP in pgAdmin, and the IP won’t change on restarts. This feature requires Windows 11 22H2 or later.
Step 4: Connect pgAdmin to PostgreSQL
Open pgAdmin on Windows and register a new server:
- Right-click Servers in the left panel and select Register > Server
- In the General tab, give it a name (anything you want, like “WSL PostgreSQL”)
- Switch to the Connection tab and fill in:
- Host name/address: your WSL IP (e.g.,
172.20.x.x) orlocalhostif using mirrored networking - Port:
5432 - Maintenance database:
postgres - Username: your PostgreSQL user (e.g.,
postgresor the user you created) - Password: your PostgreSQL password
- Host name/address: your WSL IP (e.g.,
- Check Save password if you don’t want to type it every time
- Click Save
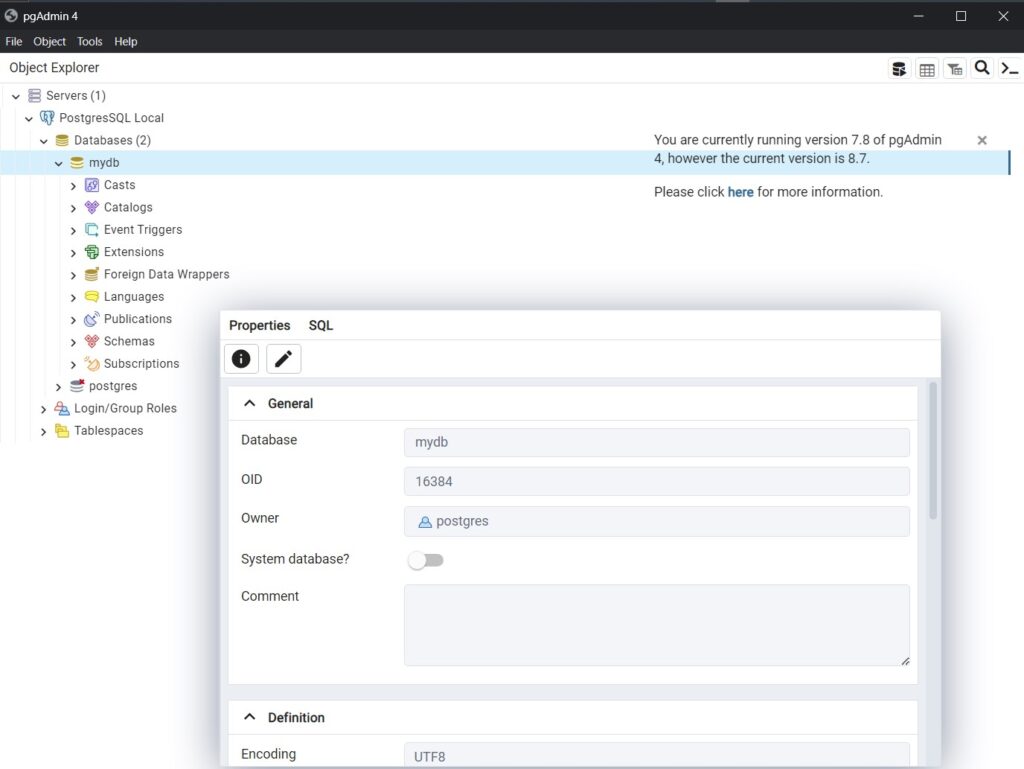
If everything is configured correctly, pgAdmin will connect and you’ll see your databases in the left panel.
Troubleshooting
Connection refused
Most common cause: PostgreSQL isn’t running. Make sure your WSL terminal is open and run:
sudo service postgresql startWSL doesn’t auto-start services. If you close your terminal, PostgreSQL stops. Keep at least one WSL terminal open while using pgAdmin.
Connection timed out
The IP address probably changed. Run hostname -I in WSL and update the host in pgAdmin’s server connection settings (right-click the server > Properties > Connection).
Password authentication failed
If you never set a password for the postgres user, you need to do that first. In WSL:
sudo -i -u postgres
psql
ALTER USER postgres WITH PASSWORD 'your_password_here';
\q
exit
Then try connecting from pgAdmin again with that password.
Verify PostgreSQL is listening on the right address
If you’ve edited the config files but connections still fail, check that PostgreSQL is actually listening on all interfaces:
ss -tlnp | grep 5432You should see 0.0.0.0:5432 in the output. If it shows 127.0.0.1:5432, the listen_addresses change in postgresql.conf didn’t take effect — double-check the file and restart PostgreSQL.
Conclusion
You now have pgAdmin 4 on Windows connected to PostgreSQL in WSL. The main things to remember: keep a WSL terminal running while using pgAdmin, and update the IP address after WSL restarts (or use mirrored networking to avoid that entirely).
If you want to practice SQL queries now, check out How to Use SQL Joins and Conditional Statements in PostgreSQL. And if you also use VS Code for development on WSL, How to Connect Visual Studio Code with WSL 2 for Linux Ubuntu is a useful companion setup.