In this tutorial, we will guide you through the process of connecting AWS Lambda to Microsoft SQL Server using PyODBC. This is particularly useful for developers and system administrators who need to interact with SQL Server databases from AWS Lambda functions.
Scope
The scope of this tutorial includes setting up a container environment, installing necessary dependencies, and creating a Lambda layer for PyODBC.
Purpose
The purpose of this tutorial is to help developers and system administrators on how to:
- Set up a container environment for building a Lambda layer.
- Install and configure PyODBC and its dependencies.
- Create a Lambda layer for PyODBC.
- Test the connection to Microsoft SQL Server from AWS Lambda.
- Deploy the setup using Serverless Framework and AWS infrastructure.
By the end of this guide, you’ll be able to successfully connect Lambda functions to SQL Server and handle database operations.
Prerequisites
Before you start, ensure you have the following:
- Docker installed on your local machine (WSL).
- Microsoft SQL Server instance hosted (on-premises or AWS EC2).
- SQL Server Credentials (username, password, connection string).
- Basic knowledge of AWS Lambda and SQL Server.
Step-by-Step Guide
The following is the folder structure after we build our PYODBC driver:
|-- pyodbc-layer
    |-- bin
    |-- include
    |-- lib
    |-- odbc.ini
    |-- ODBCDataSources
    |-- odbcinst.ini
    |-- python
        |-- pyodbc-5.1.0.dist-info
        |-- pyodbc.cpython-311-x86_64-linux-gnu.so
        |-- pyodbc.pyi
    |-- share
Follow these steps to connect AWS Lambda to Microsoft SQL Server.
Step 1: Start a Container Environment
- Open your WSL Ubuntu terminal and ensure to start your Docker.
- Run the following command to start a container using the provided AWS base image for Python 3.11
pwd # Assuming your current `-v${PWD}` path host directory is `/home/linuxbeast/pyodbc-layer/`

# Run docker container
sudo docker run -it --rm -v${PWD}:/opt/ --entrypoint bash -e ODBCINI=/opt/odbc.ini -e ODBCSYSINI=/opt/ public.ecr.aws/sam/build-python3.11:1.115.0

# Note: We use the AWS base image for Python 3.11 image to match our local script's version with the AWS Lambda environment, ensuring the pyodbc driver compiles correctly with this version.
- Once inside the container, update the image as best practice to run this command to ensure everything is up-to-date and secure:
yum update -y
- Install the necessary packages to ensure no library is missing during the driver compilation:
yum install -y nano gcc gcc-c++ make unixODBC-devel unzip python3-devel wget
Step 2: Download and Compile unixODBC
- Download and compile unixODBC:
curl ftp://ftp.unixodbc.org/pub/unixODBC/unixODBC-2.3.12.tar.gz -O
tar xvzf unixODBC-2.3.12.tar.gz
cd unixODBC-2.3.12
./configure --sysconfdir=/opt --disable-gui --disable-drivers --enable-iconv --with-iconv-char-enc=UTF8 --with-iconv-ucode-enc=UTF16LE --prefix=/opt
make
make install
- Clean up:
cd ..
rm -rf unixODBC-2.3.12 unixODBC-2.3.12.tar.gz
Step 3: Install Microsoft ODBC Driver
- Download the Microsoft Red Hat repository configuration file:
wget -qO- https://packages.microsoft.com/keys/microsoft.asc | tee /etc/pki/rpm-gpg/MICROSOFT-GPG-KEY
echo -e "[packages-microsoft-com-prod]\nname=packages-microsoft-com-prod\nbaseurl=https://packages.microsoft.com/rhel/7/prod\nenabled=1\ngpgcheck=1\ngpgkey=file:///etc/pki/rpm-gpg/MICROSOFT-GPG-KEY" > /etc/yum.repos.d/msprod.repo

# No longer working
# curl https://packages.microsoft.com/config/rhel/7/prod.repo > /etc/yum.repos.d/msprod.repo
- Install the Microsoft ODBC Driver 17 for SQL Server:
ACCEPT_EULA=Y yum install -y msodbcsql17
export CFLAGS="-I/opt/include"
export LDFLAGS="-L/opt/lib"
Step 4: Install PyODBC
- Create the necessary directories and install PyODBC library:
mkdir /opt/python/
cd /opt/python/
pip install pyodbc -t .
Step 5: Configure ODBC
- Create the
odbcinst.inifile, this file is a registry and configuration file for ODBC driver. (**Note: First, validate this file because the content below is auto-generated by default, no further change needed.):
cat <<EOF > /opt/odbcinst.ini
[ODBC Driver 17 for SQL Server]
Description=Microsoft ODBC Driver 17 for SQL Server
Driver=/opt/microsoft/msodbcsql17/lib64/libmsodbcsql-17.10.so.6.1
UsageCount=1
EOF
- Create the
odbc.inifile, this configuration file defines data sources. (**This file is empty by default.):
cat <<EOF > /opt/odbc.ini
[ODBC Driver 17 for SQL Server]
Driver = ODBC Driver 17 for SQL Server
Description = My ODBC Driver 17 for SQL Server
Trace = No
EOF
Step 6: No Text Editor? Install vim Using YUM
If your container has no text editor, you can install vim easily:
yum update -y
yum install -y nano
Optional – Add to Dockerfile:
RUN yum update -y && yum install -y nano
Step 7: Test the Connection
- Create a
test.pyfile with the following content:
import pyodbc

driver = '{ODBC Driver 17 for SQL Server}'
sqlServer = 'your_sql_server'
sqlDatabase = 'your_database'
sqlPort = 1433
sqlUsername = 'your_username'
sqlPassword = 'your_password'

def test_pyodbc():
    print(pyodbc.drivers())
    print('Attempting Connection...')
    conn = pyodbc.connect(f"DRIVER={driver};SERVER={sqlServer};PORT={sqlPort};DATABASE={sqlDatabase};UID={sqlUsername};PWD={sqlPassword}")
    print('Connected!!!')

if __name__ == "__main__":
    test_pyodbc()
- Run the Python script:
python test.py
Sample output:

Step 8: Create the Lambda Layer
- Inside the Docker container, run the following command to create a zip file of the layer:
cd /opt
zip -r9 pyodbc-layer.zip .
- Outside the Docker container, copy the zip file to your local machine (WSL):
# Target directory where you want to save the archive file
cd /mnt/c/Users/<Your_PC_User>/Downloads/

# Copy the archive file to the target directory
cp /home/linuxbeast/pyodbc-layer/pyodbc-layer.zip .
Step 9: Review Files in Archive
- You should see similar files inside your
pyodbc-layer.zip.

Step 10: Upload to Lambda Layer Using Serverless Framework
- Update your
serverless.ymlconfiguration to include the newpyodbc-layer.ziplayer:
layers:
  MSSQLPyODBC:
    name: ${sls:stage}-mssqlpyodbc-layer
    description: PyODBC library requirements for DB connection
    compatibleRuntimes: python3.11
    compatibleArchitectures: x86_64
    package:
      artifact: layers/pyodbc-layer.zip
    retain: false

functions:
  yourLambdaFunction:
    handler: handler.yourHandler
    layers:
      - !Ref MSSQLPyODBC
Final Step: Diagram – AWS Infrastructure Deployment
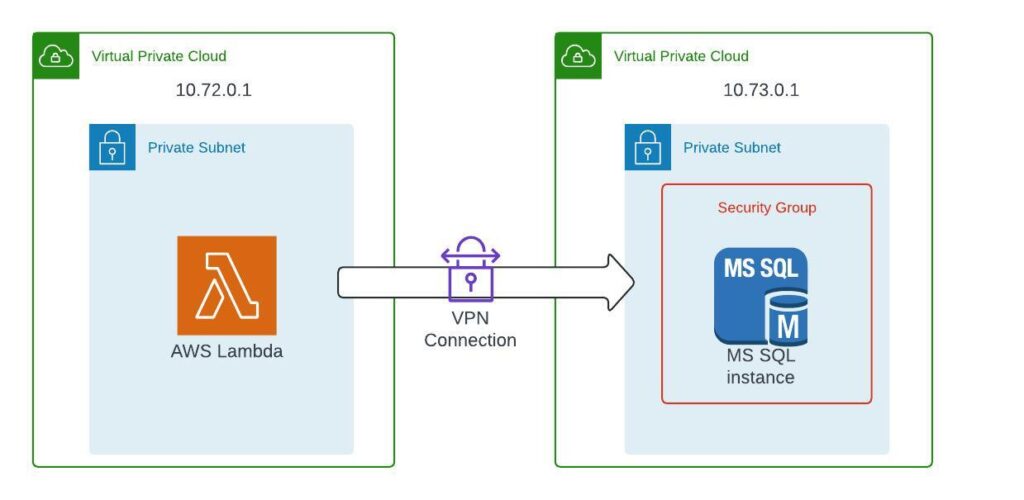
This diagram illustrating the setup for AWS infrastructure deployment, showing how a Lambda function connects to another VPC. If you are using a single VPC, a VPN is not required, making the setup straightforward. You can directly connect your Lambda function to the MS SQL Server if the same VPC is used.

In case you encounter any issues, please ensure the following:
- Database Availability: Verify that your database is operational.
- Lambda VPC Attachment: Ensure the Lambda function is properly attached to the VPC and private subnets.
- Correct Routing: Confirm that the Transit Gateway or VPN are correctly routed within the VPC AWS account.
- Security Group Configuration: Check that the security group of the database server has its inbound port open to the Lambda function, allowing private access.
- Further Assistance: If further assistance is needed, contact the Linuxbeast team.
Final Thoughts
By following these steps, you can successfully connect AWS Lambda to Microsoft SQL Server using PyODBC. This setup allows you to leverage the power of AWS Lambda for serverless computing while interacting with your SQL Server databases.

