Amazon EFS (Elastic File System) gives you shared, scalable file storage that multiple EC2 instances can mount at the same time. This guide walks you through how to mount Amazon EFS on an EC2 Ubuntu 22.04 instance using two methods: the AWS-recommended EFS mount helper and the standard NFS client.
Prerequisites
- An EC2 instance running Ubuntu 22.04 — follow How to Deploy EC2 Ubuntu 22.04 LTS on AWS if you need one
- An existing EFS file system in the same VPC as your EC2 instance
- A security group that allows NFS traffic (port 2049) between the EC2 instance and the EFS mount target
Set Up the Security Group
EFS uses NFS over port 2049. Your EC2 instance and EFS mount target need a security group that allows this traffic.
- In the AWS Console, go to EC2 > Security Groups and create a new security group (or edit an existing one)
- Add an inbound rule: Type
NFS, Port2049, Source set to the security group’s own ID (this allows any instance in the group to connect) - Attach this security group to both your EC2 instance and your EFS mount target (under EFS > Network in the console)
Without this, the mount command will hang or time out.
Get Your EFS File System ID
In the AWS Console, go to EFS > File systems and copy your file system ID. It looks like fs-0abc123def456789a. You can also find it with the AWS CLI:
aws efs describe-file-systems --query "FileSystems[*].[FileSystemId,Name]" --output tableMethod 1: Mount with EFS Mount Helper (Recommended)
The amazon-efs-utils package is the AWS-recommended way to mount EFS. It simplifies the mount command, supports TLS encryption, and handles mount target resolution automatically.
1. Install amazon-efs-utils
On Ubuntu, you need to build it from the source package:
sudo apt-get update
sudo apt-get install -y git binutils rustc cargo pkg-config libssl-dev
git clone https://github.com/aws/efs-utils
cd efs-utils
./build-deb.sh
sudo apt-get install -y ./build/amazon-efs-utils*deb2. Create a mount point and mount
sudo mkdir -p /mnt/efs
sudo mount -t efs fs-0abc123def456789a:/ /mnt/efs
Replace fs-0abc123def456789a with your actual file system ID. The EFS mount helper resolves the correct mount target for your availability zone automatically.
To mount with TLS encryption (recommended for production):
sudo mount -t efs -o tls fs-0abc123def456789a:/ /mnt/efs3. Make it persistent across reboots
Add an entry to /etc/fstab:
sudo nano /etc/fstabAdd this line at the end:
fs-0abc123def456789a:/ /mnt/efs efs _netdev,tls 0 0efs— uses the EFS mount helper as the filesystem type_netdev— tells the system to wait for the network before mountingtls— enables encryption in transit
Method 2: Mount with NFS Client
If you prefer not to install efs-utils, you can mount EFS using the standard NFS client. This works but doesn’t support TLS encryption or automatic mount target resolution.
1. Install the NFS client
sudo apt-get update && sudo apt-get install -y nfs-common2. Create a mount point and mount
sudo mkdir -p /mnt/efs
sudo mount -t nfs4 -o nfsvers=4.1,rsize=1048576,wsize=1048576,hard,timeo=600,retrans=2,noresvport fs-0abc123def456789a.efs.ap-southeast-1.amazonaws.com:/ /mnt/efs
Replace the DNS name with your EFS file system’s DNS. The format is fs-ID.efs.REGION.amazonaws.com.
3. Make it persistent across reboots
Add to /etc/fstab:
fs-0abc123def456789a.efs.ap-southeast-1.amazonaws.com:/ /mnt/efs nfs4 nfsvers=4.1,rsize=1048576,wsize=1048576,hard,timeo=600,retrans=2,noresvport,_netdev 0 0Key mount options explained:
| Option | What It Does |
|---|---|
nfsvers=4.1 | NFS protocol version required by EFS |
rsize=1048576 | Read buffer size (1 MB) for best throughput |
wsize=1048576 | Write buffer size (1 MB) for best throughput |
hard | Retries indefinitely if the server is unreachable (prevents data corruption) |
timeo=600 | Timeout before retry (60 seconds, in deciseconds) |
noresvport | Uses any available port (required for EFS reconnections) |
_netdev | Waits for network availability before mounting at boot |
Verify the Mount
Test the fstab entry and check the mount:
sudo mount -a
df -hT | grep efs
You should see your EFS file system listed with type nfs4. Write a test file to confirm read/write access:
echo "Hello EFS" | sudo tee /mnt/efs/testfile.txt
cat /mnt/efs/testfile.txt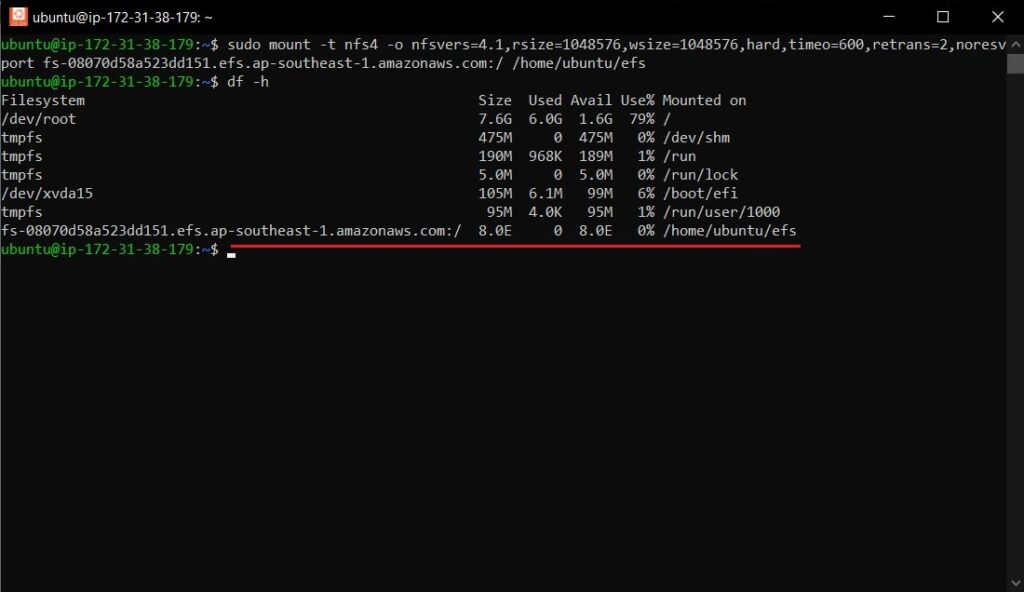
Troubleshooting
- Mount hangs or times out — check that your security group allows inbound NFS (port 2049) and that the same security group is attached to both the EC2 instance and the EFS mount target.
- “mount.nfs4: No such device” — the
nfs-commonpackage is missing. Install it withsudo apt-get install -y nfs-common. - “Connection refused” — the EFS mount target doesn’t exist in your EC2 instance’s availability zone. Check the EFS network settings in the console and add a mount target for the correct AZ.
- Mount disappears after reboot — make sure the
/etc/fstabentry includes_netdev. Without it, the system tries to mount before the network is ready and fails silently.
Conclusion
Your EC2 instance now has Amazon EFS mounted and configured to persist across reboots. EFS is ideal for shared storage across multiple instances — any file written from one instance is immediately available on all others that mount the same file system. If you need object storage instead of file storage, see How to Mount S3 Bucket on Ubuntu 22.04 with S3FS Fuse. For monitoring your EC2 setup, check out How to Install Datadog Agent with Apache2 on EC2 Ubuntu 22.04.