Claude Code is a command-line tool by Anthropic that brings Claude directly into your terminal. You can use it for code review, debugging, generating scripts, and working with files — all without leaving the command line. This guide walks you through installing and configuring Claude Code CLI on Windows PowerShell.
If you’d rather run Claude Code inside WSL, see How to Install Claude Code CLI on WSL2 Ubuntu instead.
Prerequisites
- Windows 10 or Windows 11
- PowerShell (comes with Windows)
- Node.js 18 or later — Claude Code runs on Node.js. Download it from nodejs.org if you don’t have it.
- An Anthropic account (free tier available) or API key
Install Claude Code CLI
Step 1: Open PowerShell
Press Win + X and select Terminal (or search for PowerShell in the Start menu).
Step 2: Run the installer
irm https://claude.ai/install.ps1 | iexirm— short forInvoke-RestMethod, downloads the install script from Anthropic’s site.iex— short forInvoke-Expression, executes the downloaded script.
When it finishes, you’ll see something like:
Claude Code successfully installed!
Location: C:\Users\yourname\.local\bin\claude.exe
Step 3: Add Claude to your PATH
If the installer didn’t add the binary to your PATH automatically, add it manually:
$bin = "C:\Users\yourname\.local\bin"
$userPath = [Environment]::GetEnvironmentVariable("Path", "User")
[Environment]::SetEnvironmentVariable("Path", $userPath + ";" + $bin, "User")
Replace yourname with your Windows username. Then close and reopen PowerShell so the new PATH takes effect.
Step 4: Reload PATH without restarting (optional)
If you don’t want to restart PowerShell, reload the environment variables in the current session:
$env:Path = [Environment]::GetEnvironmentVariable("Path", "Machine") + ";" + [Environment]::GetEnvironmentVariable("Path", "User")Step 5: Verify the installation
claude --versionIf this prints a version number, you’re good. You can also run claude --help to see all available flags.
Authenticate Claude Code
Run claude for the first time to start the authentication flow:
claudeThe CLI will show a welcome screen and present three login options:
- Claude account (subscription) — uses your claude.ai Pro/Team plan. Best for individual use.
- Anthropic Console (API billing) — uses API credits from your Anthropic account. Better for heavy usage or automation.
- Third-party platform — connects through AWS Bedrock, Google Vertex AI, or other providers.
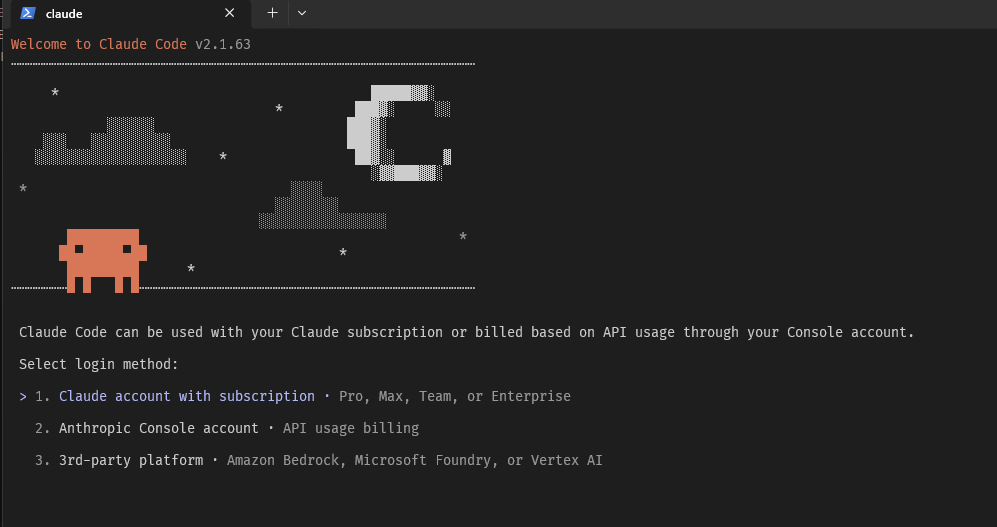
Pick one and follow the browser prompt to log in. Once authenticated, you’re back in the terminal and ready to go.
Basic Usage
Claude Code is context-aware — it reads files in your current working directory. Here are a few practical examples.
Start an interactive session in your project folder:
cd C:\Projects\my-app
claude
Ask a one-off question with -p (print mode — no interactive session):
claude -p "review my terraform code and suggest improvements"Pipe output from another command:
Get-Content error.log | claude -p "explain this error and suggest a fix"Generate a file directly:
claude -p "create a least privilege IAM policy for Lambda accessing S3" > policy.jsonUpdate Claude Code CLI
Run the same install command to update to the latest version:
irm https://claude.ai/install.ps1 | iexCheck the current version with claude --version to confirm the update.
Security Tips
- Don’t paste real credentials, API keys, or secrets into prompts. Use placeholders or describe what you need instead.
- Review any generated IAM policies or infrastructure code before applying them.
- If you’re using API billing, keep an eye on your token usage in the Anthropic Console.
Conclusion
That covers installing and setting up Claude Code CLI on Windows PowerShell. The install takes a few minutes, and from there you can use Claude directly from your terminal for code reviews, debugging, and script generation.
If you also work in WSL, check out How to Install Claude Code CLI on WSL2 Ubuntu. And if you’re setting up other CLI tools in PowerShell, How to Configure AWS SSO CLI Access for Windows PowerShell might also be useful.